Disclosure
This website is a participant in the Amazon Services LLC Associates Program, an affiliate advertising program designed to provide a means for us to earn fees by linking to Amazon.com and affiliated sites.
You can sharpen figure skate blades at home with the right tools and knowledge. This skill saves money and ensures your edges are always performance-ready. It requires precision, but our guide makes it accessible.
Dull blades ruin control and increase injury risk. Proper sharpening restores the crucial hollow, providing the grip and glide needed for jumps, spins, and secure stops. A professional-quality edge is achievable in your workshop.
The Real Problem: Dull Blades Sabotage Your Performance and Safety
Dull figure skate blades are more than just an inconvenience. They directly cause poor edge control, unstable landings, and a complete lack of “bite” on the ice. This transforms advanced maneuvers into struggles and makes basic skating feel unsafe and exhausting.
You might feel like you’re slipping out of turns or pushing harder for less speed. This is the blade’s hollow—the critical groove down the center—worn flat. Without it, you lose the precise edges needed for everything from a confident stop to a clean Lutz jump.
Your Immediate Solution: A Quality Home Sharpening Kit
For consistent maintenance between professional grinds, a dedicated home sharpening kit is the answer. It allows you to refresh your edges, correct minor nicks, and maintain peak performance on your schedule.
A highly-rated and user-friendly option is the Edge Pro 4 Professional Sharpening Kit. It’s designed specifically for figure skate hollows.
- Includes a precision aluminum jig for the correct 1/2″ radius hollow.
- Comes with three diamond honing stones (coarse, medium, fine) for complete sharpening.
- Features a sturdy deburring tool and a blade holder for safe, stable work.
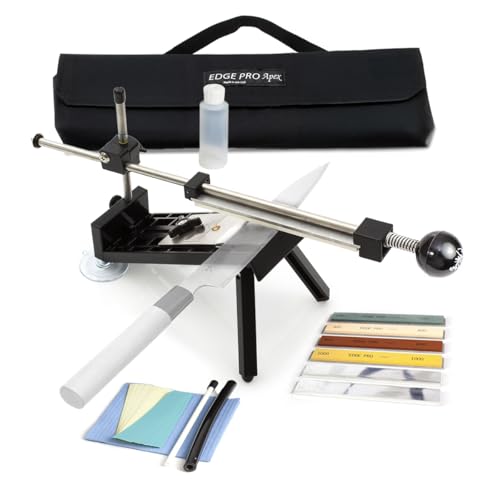
- Safe, Trusted & Professional Design – The Edge Pro Apex, a professional…
- Trusted by Professionals – Used daily and trusted by chefs, restaurants,…
- Adjustable Angle Control – Fine-tune your sharpening with continuously…
Check current price on Amazon →
When Sharpening Alone Isn’t Enough
If your blades are severely damaged, unevenly worn, or the steel is of low quality, sharpening may not restore performance. The boot itself may also be broken down, preventing proper alignment.
In these cases, the solution is investing in new, high-quality skates. For beginners, our guide on the best figure skates for beginners is the perfect starting point. If comfort is your primary concern, explore our reviews of the Jackson Ultima Classic Softskate 380 or the most comfortable ice skates on the market.
Essential Tools for Sharpening Skates at Home
Gathering the right equipment is the critical first step for safe, effective sharpening. Using improper tools can permanently damage your blades. This setup ensures precision and protects your investment.
You don’t need a professional grinding wheel. A dedicated home sharpening kit provides control for maintaining the blade’s profile. Let’s break down the must-have components.
The Core Sharpening Kit Components
Your primary tools focus on restoring the blade’s hollow and removing burrs. Each item serves a specific purpose in the sharpening process.
- Sharpening Jig: This metal guide holds your skate at the exact factory angle. It ensures you maintain a consistent radius of hollow (ROH) across the entire blade.
- Diamond Honing Stones: These abrasive stones do the cutting. You’ll typically need coarse, medium, and fine grits to progress from reshaping to polishing the edge.
- Deburring Tool: A handheld stone or ceramic rod. After sharpening, you use this to remove the tiny wire edge (burr) formed on the blade, creating a clean, sharp apex.
Essential Safety and Setup Gear
Protecting yourself and your workspace is non-negotiable. Sharpening creates metal dust and involves sharp edges.
- Sturdy Vise or Blade Holder: This securely clamps the skate boot, leaving both hands free to control the sharpening stone. Stability is key to an even result.
- Safety Glasses: Always wear eye protection. Metal filings and stone particles can easily flick into your eyes during the process.
- Well-Lit, Clean Workspace: A clear bench with good lighting allows you to see the blade’s edge clearly and check your progress frequently.
Key Takeaway: Never attempt to sharpen skates freehand. A jig and holder are mandatory for maintaining the correct blade geometry and ensuring your safety.
Step-by-Step Guide to Sharpening Your Blades
Follow this precise method to achieve professional-level edges at home. Rushing or skipping steps leads to uneven sharpening and poor ice performance. Patience and consistency are your greatest tools.
Before you begin, ensure your workspace is clean and all tools are within reach. Secure your skate in the holder and put on your safety glasses. You are now ready to start the sharpening process.
Preparation and Initial Assessment
Proper setup prevents mistakes. This phase is about inspection and alignment, not cutting.
- Clean the Blade: Wipe the blade thoroughly with isopropyl alcohol. This removes dirt, oil, and ice melt that can clog your sharpening stone.
- Mount the Skate: Clamp the boot securely in your vise or holder. The blade must be perfectly level and cannot wiggle during sharpening.
- Set the Jig: Attach your sharpening jig to the blade according to its instructions. This sets the correct angle to match your blade’s existing radius of hollow.
The Sharpening and Honing Process
This is the core action. Use firm, even pressure and let the stone do the work.
- Start with the Coarse Stone: Using the coarse-grit diamond stone, make 10-15 smooth, full-length passes from toe to heel. Apply consistent, moderate pressure.
- Progress to Finer Grits: Switch to the medium stone for another 10-15 passes. Finish with 5-10 light passes using the fine-grit stone to polish the edge.
- Deburr the Edge: Remove the jig. Gently swipe the deburring tool along each side of the blade 2-3 times. This removes the microscopic wire edge for a clean apex.
Pro Tip: After every 5 passes, wipe the blade with a clean cloth. This lets you visually check for a consistent, shiny new edge forming along the entire length.
Testing, Troubleshooting, and Maintenance Tips
Knowing how to test your sharpening job is as important as the process itself. Proper maintenance extends the life of your edges and prevents damage. This section ensures your hard work translates to perfect performance on the ice.
Don’t assume your sharpening was successful. Use these simple tests to verify edge quality before you skate. Catching problems here saves you from a frustrating and potentially unsafe session.
How to Test Your Sharpening Results
Use visual and tactile checks to assess your blade’s condition. These methods require no special equipment.
- The Fingernail Test: Gently drag your thumbnail perpendicular across the blade edge. A sharp edge will lightly catch or shave a tiny layer. A dull edge will slide smoothly.
- The Visual Reflection Test: Look down the length of the blade under good light. A sharp edge will have no reflective glint. A dull edge shows a thin, shiny line where the metal is rounded over.
- The Paper Test (Caution): Carefully hold a piece of paper and let the blade’s weight slice through it. A clean cut indicates a sharp edge; a tear suggests dullness.
Common Sharpening Mistakes to Avoid
Awareness of these errors helps you achieve better results and protect your blades.
| Mistake | Result | How to Fix/Prevent |
|---|---|---|
| Uneven Pressure | Rockered blade, uneven edges | Use consistent, full-length strokes and secure clamping. |
| Skipping Grits | Rough, jagged edge that dulls quickly | Always progress from coarse to medium to fine stones. |
| Not Deburring | Feels sharp but crumbles on ice | Always finish with light passes of a deburring tool. |
Maintenance Tip: Always dry your blades thoroughly after skating and use soft guards for walking. Store skates in breathable cloth soakers, not hard plastic guards, to prevent rust and edge damage.
When to Sharpen vs. When to Seek a Professional
Home sharpening is ideal for maintenance, but some situations require expert intervention. Recognizing the difference protects your blades from irreversible damage. It also ensures your skating technique isn’t hindered by incorrect equipment.
Even with the best home kit, a professional sharpening machine is needed periodically. This resets the blade’s fundamental profile. Think of home care as a tune-up and pro service as a major overhaul.
Signs You Need a Professional Grind
These issues go beyond a dull edge and indicate structural problems with the blade itself. A home kit cannot fix them.
- Deep Nicks or Gouges: If a rock or doorframe has taken a significant chunk out of the blade, metal must be removed evenly across its entire length, which a pro machine can do.
- Uneven Blade Wear: One edge is visibly higher than the other. This indicates the blade’s alignment (canting) is off or previous sharpening was incorrect, requiring reprofiling.
- Lost Rocker Profile: The blade should have a gentle curvature from toe to heel. If it feels flat or the wrong part touches the ice first, a pro can restore the correct rocker.
Creating Your Optimal Sharpening Schedule
Consistency is better than crisis management. A regular schedule keeps your edges predictable and performance high.
| Skater Level | Home Touch-Up | Professional Grind |
|---|---|---|
| Beginner/Recreational | Every 10-15 hours of ice time | Every 30-40 hours or once per season |
| Intermediate | Every 6-10 hours | Every 20-30 hours |
| Advanced/Competitive | Every 2-5 hours (or before key sessions) | Every 10-15 hours |
Final Check: If you’re constantly sharpening but still feel slipping, the problem may not be the blade. Consider if your skates are properly fitted and supportive enough for your skill level.
Advanced Techniques and Pro Skater Insights
Once you’ve mastered basic sharpening, you can fine-tune your edges for specific performance goals. These advanced concepts allow for customization based on ice conditions, discipline, and personal preference. Understanding them elevates your control and confidence.
This knowledge bridges the gap between a functionally sharp blade and a perfectly tuned one. It’s about optimizing the tool for your specific needs on the ice.
Understanding Radius of Hollow (ROH) Choices
The Radius of Hollow is the depth of the groove ground into your blade. It’s measured in inches and dramatically affects grip versus glide.
- Deeper Hollow (e.g., 1/2″): Provides maximum bite and grip for sharp turns and secure landings. Ideal for advanced freestyle skaters but can feel “sticky” and slow.
- Shallow Hollow (e.g., 1″ or 3/4″): Offers more glide and speed with less drag. Better for dance, figures, or skaters who prefer a smoother, less aggressive feel.
- Flat Bottom V (FBV): A professional-only profile with a flat center and angled sides. It aims to combine the glide of a shallow hollow with the grip of a deep one.
Customizing for Ice Conditions and Discipline
Your sharpening strategy should adapt to where and what you skate. This is the mark of an experienced skater.
| Condition/Discipline | Recommended ROH | Reasoning |
|---|---|---|
| Hard, Cold Ice | Shallower (3/4″ – 1″) | Prevents excessive bite that can trip you up; promotes better glide. |
| Soft, Warm Ice | Deeper (1/2″ – 5/8″) | Provides necessary grip to push through softer, slower ice. |
| Ice Dance | Shallow (7/8″ – 1″+) | Prioritizes effortless flow, deep edges, and sustained glides. |
| Freestyle/Jumps | Deeper (1/2″ – 3/4″) | Ensures solid take-off and landing grip for multi-rotation jumps. |
Pro Insight: Many elite skaters have a “test skate” with a standard hollow after a professional grind. They then note precise adjustments (e.g., “2 passes on the fine stone”) to create their perfect, personalized edge feel.
Safety Precautions and Long-Term Blade Care
Sharpening is a safe activity when proper precautions are followed. Long-term care extends the life of your blades and protects your investment. This final operational section ensures your safety and your equipment’s longevity.
Neglecting safety can lead to injury. Ignoring blade care leads to premature wear and costly replacements. These guidelines are non-negotiable for responsible skate maintenance.
Essential Safety Rules for Home Sharpening
Always prioritize personal safety over convenience. Create a strict routine you follow every single time.
- Always Wear Eye Protection: Metal filings and stone particles are projectiles. Safety glasses are mandatory from setup to clean-up.
- Secure the Workpiece Firmly: A skate slipping mid-stroke can cause severe cuts. Double-check that the boot is clamped tightly in the holder before starting.
- Work in a Clean, Uncluttered Area: Ensure good lighting and keep fingers clear of the blade’s path. Never rush the process.
Comprehensive Long-Term Blade Maintenance
What you do off the ice is as important as sharpening. Proper storage and handling prevent rust and damage.
- Immediate Drying: After skating, thoroughly wipe blades dry with a soft, absorbent cloth. Pay special attention to the crevice of the hollow and the screw holes.
- Correct Storage: Always use absorbent terrycloth soakers for storage. They wick away residual moisture. Never store skates in hard plastic guards, as they trap moisture and cause rust.
- Protect During Transport: Use hard guards ONLY for walking to and from the ice. Remove them immediately when you sit down to prevent moisture buildup and edge compression.
Critical Warning: Never attempt to sharpen a blade that is still attached to the boot without a proper holder. The forces involved can break down the boot’s sole and permanently misalign the blade.
Frequently Asked Questions About Skate Sharpening
This section addresses common concerns and clarifies misconceptions. Having clear answers builds confidence for skaters new to blade maintenance. These are the questions pros hear most often from students and parents.
Understanding the “why” behind the process helps you make better decisions. It also prevents the frustration that comes from trial and error.
Common Beginner Questions Answered
New skaters often worry about damaging their blades or doing it wrong. Here’s reassurance and guidance.
- “How do I know if my blades are dull?” You’ll feel a lack of control on edges, slip during pushes, and struggle to stop. Visually, the edges will look rounded and may reflect light.
- “Can I ruin my skates by sharpening them myself?” Yes, if you use the wrong tools or technique. However, following this guide with a proper kit minimizes risk. Start with an old pair if you’re nervous.
- “How often should I really sharpen?” Frequency depends on use, not time. Refer to the schedule in Section 4, but always let the feel on the ice be your final guide.
Technical and Cost-Related Questions
These questions delve into the specifics of equipment and value.
| Question | Detailed Answer |
|---|---|
| “Is a home sharpening kit worth the cost?” | Absolutely. At ~$100-$200, a quality kit pays for itself after 5-10 professional sharpening sessions. It offers convenience and consistent edges. |
| “What’s the difference between sharpening and profiling?” | Sharpening refreshes the edges within the existing hollow. Profiling reshapes the entire bottom curve (rocker) of the blade, which requires a professional machine. |
| “Can I change my blade’s Radius of Hollow at home?” | Most home jigs are set for one ROH (often 1/2″). To change it, you need a different jig or a professional grind to establish the new hollow profile first. |
Final Advice: When in doubt, consult a reputable skate technician. They can assess your blades, recommend an ROH, and provide a baseline professional grind from which you can maintain at home.
Best Sharpening Kits for Figure Skates – Detailed Comparison
Choosing the right kit is crucial for success. These three options cover different needs and budgets, from the serious home user to the occasional tuner. Each provides the essential tools for maintaining a professional-quality edge.
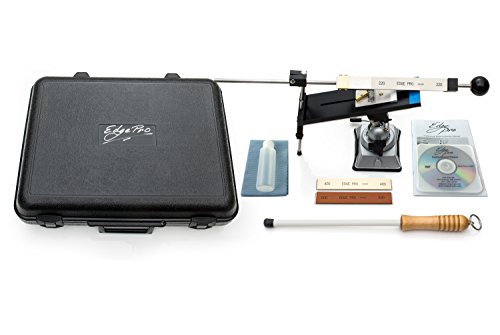
EdgePro Pro 2 Kit Sharpening Kit – Best Overall Choice
This comprehensive kit is ideal for dedicated skaters. It includes a precision-milled aluminum jig for a consistent 1/2″ hollow, three diamond stones, and a deburring tool. Its durability and all-in-one design make it the top recommendation for regular, reliable maintenance.
EdgeMaster Skate Sharpening System – Best for Versatility
The EdgeMaster system stands out with its adjustable jig, allowing you to maintain different hollow radii (3/8″ to 1″). It includes ceramic finishing stones and a blade alignment tool. This is the best option for skaters who experiment with ROH or sharpen multiple pairs with different profiles.

- QUICK RESULTS: This system will put a honed and polished razor sharp edge…
- COMPLETE KIT: The Deluxe Kit system comes complete with abrasive and…
- SHARPEN ANY BLADE: Circular blades, curved blades, reverse curved blades,…
Retrospec Upkeep Skateboard Multi Tool – Best Budget-Friendly Option
Perfect for beginners or occasional touch-ups, the kit focuses on core essentials. It features a fixed-angle plastic jig, a combination grit stone, and a simple blade holder. It’s the ideal, low-cost entry point for learning the process without a major investment.

- MASTER OF ALL TOOLS: From axle nuts to mounting hardware, this…
- QUICK-DRAW DESIGN: The 2-in-1 Allen wrench and Phillips head screwdriver…
- GRAB & GO COMPANION: Lightweight and compact, this tool rides in your…
Conclusion: Mastering Your Skate Sharpening at Home
Learning to sharpen figure skate blades at home is a valuable skill. It provides consistent performance, saves money, and builds a deeper connection to your equipment. You gain complete control over your edge quality.
The key is using the right tools and following a meticulous process. Start with a quality kit and practice on an old pair of skates first. Patience and precision will yield professional results.
Take the first step by gathering the essential tools outlined in this guide. Your confidence on the ice begins with a perfect edge. You now have the knowledge to achieve it yourself.
Frequently Asked Questions about Sharpening Figure Skate Blades
What is the radius of hollow (ROH) in figure skates?
The radius of hollow (ROH) is the depth of the groove ground into your blade’s bottom. It’s measured in inches, like 1/2″ or 3/4″. This groove creates the two distinct inside and outside edges you use to push, turn, and stop on the ice.
A deeper hollow (smaller number) gives more grip but less glide. A shallower hollow (larger number) provides more speed and slide. Most recreational skaters start with a standard 1/2″ or 5/8″ ROH.
How often should I sharpen my figure skates?
Sharpening frequency depends entirely on how much you skate and your skill level. A general rule is every 15-20 hours of ice time for recreational skaters. Competitive skaters may need sharpening every 5-10 hours to maintain peak edge performance.
Listen to your skates. If you’re slipping on edges, struggling to stop, or feel unstable, it’s time. Don’t sharpen based on a calendar schedule, but on the feel and performance on the ice.
Can I sharpen my skates with a regular metal file?
No, you should never use a regular metal file or a bench grinder. These tools are not designed for the precise hollow geometry of a figure skate blade. They will flatten the hollow, ruin the rocker profile, and likely overheat the steel, damaging its temper.
Always use tools designed specifically for skate sharpening. A proper kit uses a jig to maintain the correct angle and diamond or ceramic stones that cut without generating excessive heat.
What is the best way to test if my blades are sharp?
The most common and safe test is the fingernail test. Gently drag your thumbnail perpendicular across the blade edge (not along it). A sharp edge will lightly catch or shave a tiny bit of your nail. A dull edge will slide smoothly without any bite.
You can also perform a visual check. Look down the sharpened edge under good light. A sharp edge will have no reflective glint. If you see a thin, shiny line, the edge is rounded and dull.
Why do my newly sharpened skates feel “catchy” or uneven?
This is often caused by a burr, or “wire edge,” left on the blade after sharpening. It’s a tiny, fragile lip of metal that feels sharp but folds over on the ice. It can make one edge feel grabby while the other feels dull.
The solution is proper deburring. Always finish your sharpening process by lightly swiping a dedicated deburring stone or ceramic rod along each side of the blade to remove this micro-burr and create a clean apex.
Is it worth buying a home sharpening kit versus using a pro shop?
Yes, for most regular skaters, a home kit is a worthwhile investment. A quality kit pays for itself after 5-10 professional sharpening sessions. It offers unmatched convenience, allowing you to refresh edges exactly when needed, not when the shop is open.
However, you should still visit a professional with a grinding machine periodically (e.g., every 3-4 home sharpening sessions) to reset the blade’s profile and correct any minor uneven wear that home tools cannot fix.
What should I do if I put a deep nick in my blade?
For a single, deep nick, you can often sharpen it out at home with multiple passes using a coarse-grit stone. You must sharpen the entire blade length evenly until the nick disappears, which will shorten the blade’s lifespan slightly.
If there are multiple deep nicks or the blade is severely damaged, take it to a professional. They have the equipment to remove significant amounts of metal evenly across the entire blade to restore a perfect profile.
How do I prevent rust on my skate blades?
Immediate and thorough drying is the most critical step. After skating, wipe blades completely dry with a soft, absorbent cloth. Pay special attention to the hollow and screw holes where moisture hides.
Always store your skates in breathable terrycloth soakers, never in hard plastic guards. The soakers absorb residual moisture. In humid climates, a light coat of blade oil after drying can provide extra protection.