Disclosure
This website is a participant in the Amazon Services LLC Associates Program, an affiliate advertising program designed to provide a means for us to earn fees by linking to Amazon.com and affiliated sites.
Properly lacing your figure skates is the critical first step to achieving maximum ankle support and control on the ice. Incorrect lacing can lead to instability, blisters, and even injury, undermining your performance. This complete guide provides expert tips and proven methods to transform your skate fit.
You will learn the step-by-step lacing technique used by professionals to lock your heel, secure your ankle, and provide a custom, supportive fit. Master this fundamental skill to skate with greater confidence and power.
The Hidden Problem: Why Your Skates Feel Unstable
Many skaters struggle with wobbling ankles, heel slippage, or painful pressure points. They often blame their skates or their own skill level. The real culprit is frequently improper lacing technique.
Lacing too loosely creates dangerous gaps that reduce control. Lacing too tightly cuts off circulation and causes foot pain. Both mistakes prevent the skate from forming the rigid, supportive extension of your leg that advanced moves require.
Quick Fix: The Essential Lacing Tool
For a tighter, more secure pull without straining your fingers, a quality skate hook is invaluable. It helps you achieve consistent tension, especially on the top eyelets crucial for ankle lock.
Recommended Product: Rollerblade Skate Hook
- Durable, molded plastic construction.
- Ergonomic handle for comfortable use.
- Essential for tightening skates quickly and effectively.

- THIS ACCESSORY IS FOR – Servicing skate needs with an anatomically-shaped…
- IDEAL TORQUE AND LEVERAGE with wider grip handle.
- 4mm HEX KEY allows for changing/tightening axles on skates and servicing…
Check current price on Amazon →
When Lacing Alone Isn’t Enough
If you’ve mastered lacing but still experience significant discomfort or lack of support, the skate itself may be the issue. Beginner skates often have soft boots that cannot provide enough structure, no matter how well you lace them.
Upgrading to a skate with a more supportive boot is the next logical step. For guidance, explore our detailed guide on the best figure skates with supportive stainless steel blades.
Consider models known for excellent ankle support, like those in our Riedell Soar ice skates review or our Jackson Ultima Classic Softskate 380 review.
Step-by-Step Guide to Lacing Figure Skates
This proven method ensures a secure, comfortable fit from toe to top. Follow these steps in order for optimal ankle support and heel lock. Proper technique here is more important than pulling with maximum force.
Step 1: Preparing the Lace and Foot
Begin by loosening the laces fully and inserting your foot. Before pulling anything tight, ensure your heel is seated all the way back in the boot. This is the foundation for a proper fit.
- Heel Check: Tap your heel on the ground while seated to settle it back.
- Toe Room: Your toes should lightly brush the front, not be jammed.
- Start Point: Begin lacing from the bottom eyelets, pulling the ends evenly.
Step 2: The Criss-Cross Pattern for Mid-Foot Security
Work your way up the boot using a standard criss-cross pattern. The tension here should be snug but not restrictive. This section secures the widest part of your foot.
Pull each cross evenly as you move upward. Your foot should feel held in place without any pinching. This prevents side-to-side movement inside the boot.
Step 3: The Critical Ankle Lock Technique
As you approach the ankle hooks or top eyelets, the method changes. This is where you create true stability. For the hooks directly surrounding your ankle bone, use a parallel lacing technique.
- Instead of crossing, run each lace end directly up to the next hook on the same side.
- This creates a series of parallel lines that wrap and support the ankle without cutting in.
- Maintain firm, even tension on both sides as you move up.
Step 4: Tying Off for Maximum Hold
For the final top hooks or eyelets, cross the laces once more before tying your bow. This final cross creates a locking mechanism. Pull tight to secure the entire upper cuff.
- Double Knot: Always use a double knot to prevent loosening during a session.
- Bunny Ears: Tuck the loops and ends neatly to avoid catching on anything.
- Comfort Check: You should be able to flex your knee forward without restriction.
Advanced Lacing Methods for Common Fit Issues
Standard lacing doesn’t work for every foot. These targeted techniques solve specific fit problems for a custom feel. Addressing these issues can eliminate pain and boost performance immediately.
Fixing Heel Slippage and Lift
Heel lift is a common instability culprit. The “Lock Lacing” or “Runner’s Loop” technique creates a powerful anchor. This method pulls the boot’s collar down and back around your Achilles tendon.
- Lace normally until the second-to-last eyelet or hook.
- Instead of going to the top, thread each lace end back down into the loop formed on the same side.
- Pull the ends upward to tighten the lock, then proceed to the top hook and tie normally.
Relieving Pressure on the Top of the Foot
A high instep or foot bone can cause painful pressure. The “Window Lacing” method creates relief by skipping a cross. This removes direct pressure from the sensitive area.
- Identify the Pressure Point: Note which eyelet pair causes pain.
- Create the Window: At that point, run the lace straight up to the next eyelet on the same side, skipping the cross.
- Resume Normal Lacing: Continue your criss-cross pattern above the window.
Accommodating Wide Forefoot or Narrow Heel
This combination requires different tensions in different zones. A two-zone lacing strategy provides a precise solution.
| Foot Zone | Lacing Method | Purpose |
|---|---|---|
| Forefoot (Wide) | Skip eyelets or use a wide cross | Provides necessary volume without tightness. |
| Midfoot | Standard criss-cross | Begins to secure the foot. |
| Ankle/Narrow Heel | Parallel lacing or Lock Lace | Snugs down the boot collar for a secure heel hold. |
Choosing the Right Laces and Maintenance Tips
Your lacing technique is only as good as the lace itself. Worn or incorrect laces will fail to hold tension. Selecting the right type and maintaining them is crucial for consistent support and safety.
Waxed vs. Non-Waxed Laces: Which is Better?
This choice significantly impacts hold and ease of use. Waxed figure skate laces are generally superior for performance skating.
- Waxed Laces: The coating increases friction, helping knots and tension stay locked in place. They are also easier to thread and pull tight.
- Non-Waxed Laces: Can stretch more over time and may loosen during a session. They are often found on beginner or recreational skates.
For advanced moves and maximum support, upgrading to quality waxed laces is a simple, high-impact improvement.
Determining the Correct Lace Length
Laces that are too short won’t allow a proper tie-off. Laces that are too long create tripping hazards. Use this simple method to find your size.
- Remove your old lace and lay it flat.
- If it was the correct length, measure it and buy the same size.
- If unsure, consult your skate manufacturer’s recommendation, which is often based on boot height and eyelet count.
Routine Care and When to Replace
Proper maintenance extends lace life and ensures reliability. Inspect your laces every time you put your skates on.
| Sign | Action |
|---|---|
| Fraying or broken fibers | Replace immediately. This indicates weakness. |
| Stretched out, won’t hold tension | Replace. The lace has lost its integrity. |
| Dirt & grime buildup | Clean with a damp cloth. Avoid harsh chemicals that degrade fibers. |
| Knots that constantly come undone | Likely a sign of a worn, smooth surface. Time for new laces. |
Pro Tips for Different Skating Disciplines
Lacing needs vary between figure skating styles. A recreational skater has different support requirements than a competitive jumper. Tailoring your approach enhances performance and comfort for your specific activity.
Lacing for Freestyle and Jump Training
This discipline demands the highest level of ankle support for landing impact. The focus is on maximum lockdown around the ankle and heel to prevent injury.
- Top Hook Priority: Ensure the top two hooks are very tight to create a solid cuff.
- Lock Lacing Essential: Use the runner’s loop method detailed earlier to eliminate any heel lift.
- Flex Check: After tying, perform a deep knee bend. Your heel must stay planted, with flexion coming from the ankle, not slippage.
Lacing for Dance and Footwork Sequences
Ice dance and intricate footwork require more ankle flexibility for deep edges and quick turns. Support is still critical, but some give is needed.
Consider slightly loosening the tension on the very top hook compared to freestyle lacing. This allows for the necessary forward flex while maintaining mid-foot and lower-ankle security. The parallel lacing technique around the ankle bone is perfect here.
Lacing for Beginners and Recreational Skating
Comfort and consistent, moderate support are the goals. Avoid overtightening, which can cause rapid fatigue and foot pain for new skaters.
| Focus Area | Recommendation | Reason |
|---|---|---|
| Overall Tightness | Snug, but not painful | Builds stamina and allows for learning proper knee bend. |
| Ankle Support | Standard criss-cross, firm on top hooks | Provides stability without over-restricting developing muscles. |
| Common Mistake | Lacing too tightly at the toe box | Restricts circulation and causes numbness. Keep the first few crosses comfortably snug. |
Troubleshooting Common Lacing Problems
Even with the right technique, you might encounter specific issues. This troubleshooting guide addresses the most frequent complaints skaters have after lacing up. Quick fixes can make a dramatic difference.
Dealing with Numbness or Tingling Feet
This is usually caused by excessive pressure on the top of the foot or lacing too tightly overall. It restricts blood flow and nerve function.
- Immediate Action: Loosen your skates completely and allow circulation to return.
- Re-lace Strategically: Use the “Window Lacing” method to relieve pressure over the high instep or foot bones.
- Check Toe Box Tightness: Ensure the first few crosses over the forefoot are only snug, not cinched tight.
Solving Persistent Heel Lift
If your heel still slips after using the lock lacing method, the issue may be deeper. The boot might be too wide in the heel for your foot shape.
- Try a Heel Pad: A self-adhesive foam or gel pad placed in the boot’s heel pocket can take up excess volume.
- Check Lace Length: Laces that are too short won’t allow you to properly cinch the top hooks. Ensure you have enough length for a full, tight pull.
- Consider Professional Fitting: Some skate shops can “punch out” or heat-mold specific areas for a better heel pocket.
Laces That Constantly Come Untied
This frustrating problem is a safety hazard. It’s often a combination of lace type and knot technique.
| Cause | Solution |
|---|---|
| Non-waxed, slippery laces | Upgrade to waxed figure skate laces. The coating provides crucial friction. |
| Using a single granny knot | Always tie a secure double knot. Make the first bow, then loop the ears a second time before pulling tight. |
| Worn-out, smooth laces | Replace them. Old laces lose their texture and ability to hold a knot. |
Final Checklist and Practice Recommendations
Mastering skate lacing requires knowledge and consistent practice. Use this final checklist before every session. Developing a reliable routine ensures you never compromise on support or safety.
Pre-Skate Lacing Checklist
Run through these five points after tying your skates and before stepping on the ice. This takes less than a minute but is invaluable.
- Heel Plant Test: Stand up. Can you lift your heel inside the boot? If yes, re-lace with focus on the lock technique.
- Knee Bend Flex: Perform a deep knee bend. Your heel must stay down, and flexion should feel controlled, not forced.
- Circulation Check: Wiggle your toes. They should move freely without numbness or tingling.
- Side-to-Side Stability: Lean gently to each side. Your ankle should feel supported, not wobbly.
- Knot Security: Tug on the loops of your bow. Is it a tight double knot? Are the ends tucked away neatly?
How to Practice and Refine Your Technique
Don’t wait for the rink. Practice lacing at home while watching TV. This builds muscle memory without time pressure.
- Time Yourself: Aim to complete a proper, secure lace job in under 3 minutes consistently.
- Experiment Off-Ice: Try different methods (lock lacing, window lacing) at home to see how they feel on your feet.
- Seek Feedback: Ask a coach or experienced skater to watch you lace up and check your heel lock and ankle position.
When to Re-Tighten During a Session
Laces can settle and loosen slightly after the first 10-15 minutes of skating. Plan for a quick mid-session check.
| Situation | Action |
|---|---|
| After warm-up laps | Do a quick re-pull on the top two hooks and re-tie. This catches initial settling. |
| Feeling a “slop” or slight movement | Find the bench. Re-lace the entire skate for consistent tension. |
| Never mid-program or drill | Always address looseness fully before attempting advanced elements. Safety first. |
Beyond Lacing: Complementary Gear for Ultimate Support
Perfect lacing is the foundation, but other equipment choices can enhance stability and comfort. These complementary items work with your lacing technique to create a complete, supportive system.
The Role of Proper Skate Socks
Your socks are the critical interface between your foot and the laced boot. The wrong socks can undermine even the best technique.
- Thin, Moisture-Wicking Fabric: Look for technical blends (like acrylic or thin wool) that reduce bulk and pull sweat away. Avoid thick cotton, which holds moisture and causes slippage.
- Seamless or Flat-Toe Seams: This prevents painful rubbing and blisters over long sessions.
- Proper Height: Socks should be tall enough to prevent the boot’s top edge from rubbing your skin directly.
Using Ankle Sleeves and Bracing Wisely
For skaters with previous injuries or who need extra proprioceptive feedback, external support can be beneficial. Use these tools thoughtfully.
Neoprene ankle sleeves provide light compression and warmth, which can enhance the feeling of stability. For more significant support, a lace-up brace can be worn under the skate. Always ensure your skate still fits properly with any brace inside.
Ensuring a Perfect Overall Skate Fit
No lacing method can compensate for a fundamentally ill-fitting skate. Your boots are the most important piece of equipment. If you struggle with fit, it may be time for an upgrade.
| Fit Issue | Lacing Can Help? | Ultimate Solution |
|---|---|---|
| Minor heel slippage | Yes (Lock Lacing) | Heel pads or different lacing. |
| Generalized pain or pressure | Partially (Window Lacing) | Professional punching or heat molding. |
| Boot too wide/long overall | No | New skates. Explore our guide to the best comfortable ice skates for a proper fit. |
| Lack of ankle support structure | No | Upgrade to a stiffer boot. Read our Lake Placid Cascade review for a supportive option. |
Best Lacing Products for Figure Skaters – Detailed Comparison
Upgrading your lacing accessories can transform your fit and experience. These three products are highly recommended by skaters for durability, grip, and ease of use.
Rollerblade Premium Skate Hook – Best Overall Tool
This durable, molded plastic hook provides superior leverage for tightening top hooks. Its ergonomic handle prevents finger strain, allowing you to achieve a consistent, tight pull every time. Ideal for all skaters seeking a reliable, long-lasting basic tool.
- THIS ACCESSORY IS FOR – Servicing skate needs with an anatomically-shaped…
- IDEAL TORQUE AND LEVERAGE with wider grip handle.
- 4mm HEX KEY allows for changing/tightening axles on skates and servicing…
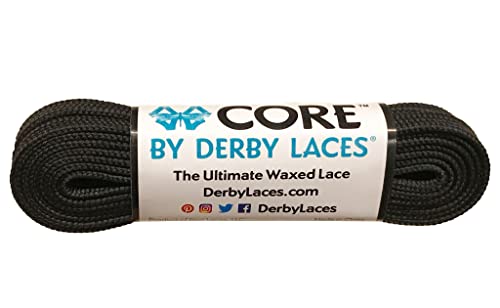
Derby Laces CORE Narrow 6mm Waxed Lace – Best Lace Upgrade
Specifically designed for figure skates, these laces feature a strong wax coating for maximum hold. They resist stretching and keep knots securely locked. The 96-inch length accommodates most boot heights. The ideal choice for replacing worn, slippery stock laces.
- LIGHTLY WAXED NARROW LACE: Sold as One Pair (Two Laces). Laces are flat and…
- SUITABLE FOR: Figure Skates, Boots, Regular Shoes, Roller Skates wanting a…
- DURABLE FIBERS: Braided from a blend of high quality, high tenacity fibers….
Ezeefit Ankle Bootie Sleeves – Best Complementary Support
These thin, seamless neoprene sleeves add a layer of comfort and light compression. They prevent heel and ankle blisters by reducing friction and can enhance proprioception. Perfect for skaters who need a little extra padding without adding bulk inside the boot.

- The ultimate blister solution
- Creates friction barrier
- Great performance wet or dry
Conclusion: Mastering Your Skate Fit for Peak Performance
Properly lacing your figure skates is a foundational skill for safety and success. It transforms your boots into a stable, responsive extension of your body. The techniques outlined here solve common problems like heel slippage and pressure points.
The key takeaway is consistent, even tension from toe to top, not brute force. Use the advanced methods to customize the fit for your unique foot shape and skating discipline.
Practice your lacing routine at home to build muscle memory. Then, step onto the ice with the confidence that comes from maximum support. Your improved control and comfort will be immediately noticeable.
Frequently Asked Questions about Lacing Figure Skates
How tight should figure skates be laced?
Figure skates should be laced snugly with consistent tension, not painfully tight. Your heel must be locked in place with zero lift. You should be able to perform a deep knee bend without your heel slipping or feeling restricted blood flow to your toes.
Avoid creating pressure points. The goal is even support throughout the boot. If you feel numbness, loosen the laces immediately and re-lace with less tension in the affected area.
What is the best way to lace skates to prevent heel slippage?
The best method is the “Lock Lacing” or “Runner’s Loop” technique. When you reach the second-to-last eyelet, thread each lace back down through the loop on the same side before pulling up to the top hook.
This creates a secure anchor that pulls the boot’s collar down and back around your Achilles tendon. Combined with a tight pull on the top hooks, it effectively eliminates heel lift for maximum stability.
Are waxed or non-waxed laces better for figure skating?
Waxed laces are generally superior for figure skating performance. The wax coating increases friction, helping the laces hold their tension and keeping knots securely tied throughout your session. They are also easier to thread and pull tight.
Non-waxed laces can stretch and loosen more easily. For recreational skating, they may suffice, but for jumps, spins, and advanced footwork, upgrading to quality waxed laces is highly recommended.
How often should I replace my figure skate laces?
Replace your laces as soon as they show signs of wear. Key indicators include fraying, significant stretching where they no longer hold tension, or a loss of the wax coating making them slippery. A broken lace during activity is a serious safety risk.
For frequent skaters, inspect laces monthly. It’s good practice to keep a spare pair in your skate bag. Fresh laces are a low-cost way to ensure reliable support.
What should I do if my feet go numb while skating?
Immediately stop and loosen your skates to restore circulation. Numbness is often caused by lacing too tightly over the top of the foot (instep) or at the toe box. When re-lacing, use less tension in the initial crosses.
Consider using the “Window Lacing” method to relieve pressure on sensitive areas. If numbness persists, your skates may be too narrow or shallow for your foot shape, requiring professional fitting.
Is there a different lacing technique for ice dance versus freestyle?
Yes, the techniques can be tailored. For freestyle and jumps, prioritize maximum lockdown using lock lacing and very tight top hooks to support landing impact. For ice dance, you may slightly loosen the top hook to allow for the deeper knee bends and ankle flexion required for complex edges and turns.
In both cases, a secure heel lock is non-negotiable. The adjustment is primarily in the tightness of the upper cuff, not the base security of the foot.
Can proper lacing fix skates that are too big?
Proper lacing can improve the fit of slightly roomy skates, but it cannot fix skates that are fundamentally too big in length or volume. Techniques like lock lacing can reduce heel lift, and wearing thicker socks or adding an insole can take up some extra space.
However, if there is excessive space around your foot or your toes don’t brush the front, the skates are likely the wrong size. No lacing method can compensate for a poor initial fit, which can hinder progress and cause injury.
What is the correct way to tie a double knot that won’t come undone?
After making your initial bow, loop the two “bunny ears” around each other a second time before pulling them tight. This creates a secure square knot that resists slipping. Ensure you are pulling the loops, not the loose ends, to tighten.
For extra security, tuck the finished knot and loops into the top of your skate cuff. This also prevents them from catching on anything or dragging on the ice during spins and footwork.