Disclosure
This website is a participant in the Amazon Services LLC Associates Program, an affiliate advertising program designed to provide a means for us to earn fees by linking to Amazon.com and affiliated sites.
Heat molding figure skate boots is the professional process of customizing new skates to your foot’s exact contours. This technique solves the common problem of painful break-in periods and poor fit. Our complete guide provides expert tips and proven methods for a perfect, performance-enhancing custom fit.
Proper heat molding transforms stiff, uncomfortable boots into a second skin. It accelerates break-in, prevents blisters, and dramatically improves on-ice comfort and control. Mastering this skill is essential for every serious skater looking to optimize their equipment.
The Painful Reality of New Figure Skates
New figure skate boots are notoriously stiff and unforgiving. This rigidity is necessary for ankle support but creates a painful break-in period. Skaters often face blisters, pressure points, and general discomfort that can hinder progress and enjoyment on the ice.
This common struggle leads many to wonder if they bought the wrong size or model. The truth is, even the best figure skates for beginners require customization to match your unique foot shape. Heat molding is the bridge between a factory-made boot and a truly personal fit.
Your Essential Tool for a Perfect Mold
To heat mold boots at home safely, you need controlled, even heat. A standard hair dryer often lacks the consistent temperature needed for proper molding. For reliable results, a specialized boot dryer with a heat function is a superior tool.
Consider the PEET Shoe and Boot Dryer. It provides gentle, circulating warmth that softens boot materials evenly without risk of scorching.
- Gentle, forced-air circulation for uniform heating.
- Dries and deodorizes skates after use.
- Durable construction for long-term gear care.
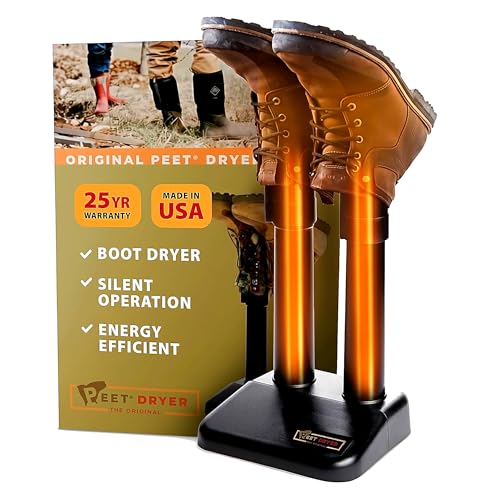
- SILENT, ALWAYS-ON DRYING: The Original PEET uses a patented DryPort system…
- DRIES MOST FOOTWEAR OVERNIGHT: Safe, gentle airflow reaches the inside of…
- EXPAND YOUR DRYING SYSTEM: Compatible with PEET Helmet DryPort, Glove…
Check current price on Amazon →
When a Simple Heat Mold Isn’t the Answer
If your boots are consistently painful even after heat molding, the core issue might be the boot itself. A poor initial fit cannot be fully corrected. This signals it’s time to consult a professional fitter or consider a different skate model designed for your foot type and skill level.
For example, our in-depth 5th Element Grace Ice Skates review highlights a boot built for superior comfort. Alternatively, explore our curated list of the most comfortable ice skates on the market to find a better starting point. Always ensure you’re in the right boot before attempting customization.
Step-by-Step Guide to Heat Molding at Home
Heat molding your figure skates at home is straightforward with the right tools and care. This process uses controlled heat to soften the boot’s internal materials. You then wear the skates as they cool, creating a perfect impression of your foot.
Following a precise method ensures safety and optimal results. Rushing or using excessive heat can damage your boots permanently. Let’s walk through the proven professional technique you can use safely.
Gathering Your Essential Heat Molding Tools
You don’t need professional shop equipment for an effective home mold. The right household tools can yield excellent results. Preparation is key to a smooth, uninterrupted process.
You will need a few specific items to perform the job correctly:
- Heat Source: A hairdryer is the most common tool. Use one with multiple heat/airflow settings. A specialized boot dryer with a heat function is even better for even warmth.
- Protective Gear: Wear the exact skating socks you plan to use. Have your skate guards ready to walk in.
- Timing Device: Use a phone timer or clock. Precise timing prevents overheating.
- Lace Hook: This helps achieve tight, even lacing pressure during the molding phase.
The Safe Heat Application Process
Applying heat correctly is the most critical phase. The goal is to warm the boot’s interior thoroughly, not to cook the exterior. Start with your skates at room temperature and unlaced.
- Heat the Boot Interior: Insert the hairdryer nozzle into the boot. Use a medium heat setting and keep it moving. Heat each boot for 3-5 minutes, focusing on the heel pocket and ankle areas where pressure points form.
- Check for Pliability: Carefully feel the inside of the boot. The lining and padding should feel very warm and noticeably softer. It should not be hot enough to burn your skin.
- Immediate Wear and Lace-Up: As soon as heating is complete, put your socked foot into the warm boot. Lace it up tightly and evenly, starting from the toes and working up, using a lace hook for maximum tightness.
Stand and walk in the skates with guards on for 15-20 minutes as they completely cool. This is when the custom mold sets. Avoid sitting down, as this changes your foot’s position in the boot.
Professional Shop Molding vs. DIY: What You Need to Know
While home molding is effective, professional heat molding at a skate shop offers distinct advantages. Pro shops use specialized ovens that heat the entire boot uniformly to a precise temperature. This method, often called thermal molding, can handle advanced materials in high-end skates.
Understanding the differences helps you choose the best path for your skates and budget. Each method has its ideal use case. Let’s compare the key factors to consider.
| Factor | Professional Shop Molding | DIY Home Molding |
|---|---|---|
| Equipment | Convection oven for even, full boot heat. | Hairdryer or boot dryer for targeted heat. |
| Best For | High-end boots with complex foams, new skaters, or persistent fit issues. | Mid-range boots, minor adjustments, and experienced skaters comfortable with the process. |
| Cost & Convenience | Typically $20-$50 per pair; requires a trip to the shop. | Low cost (just your time); can be done immediately at home. |
| Control & Customization | Expert fitter can spot issues and use punches for specific bumps. | You control the feel, but lack professional diagnostic insight. |
When to Choose Professional Heat Treatment
Investing in a pro shop mold is wise in several specific scenarios. The expertise and equipment can solve problems a hairdryer cannot. It provides peace of mind and a guaranteed quality of work.
You should strongly consider professional molding if:
- You own high-performance skates with advanced thermoformable materials like those in our reviewed Riedell Soar skates.
- You are a beginner and unsure of the correct fit feel, as detailed in our beginner skate guide.
- You have significant, specific pressure points (like a bony prominence) that may require “spot punching” by a fitter.
Maximizing Your DIY Molding Success
If you proceed with home molding, a few pro tips will elevate your results. The goal is to mimic the even heat application of a shop oven as closely as possible. Patience and attention to detail are your best tools.
Follow these advanced guidelines for a better custom fit:
- Heat in Stages: Warm the boot for 2 minutes, then let the heat diffuse for 1 minute before reheating. This prevents surface overheating.
- Flex During Cooling: While the boots cool on your feet, perform gentle knee bends to mold the ankle flex point.
- One Boot at a Time: Always heat and mold one skate completely before starting the second. This ensures you can give each boot full attention.
Common Heat Molding Mistakes and How to Avoid Them
Avoiding common errors is crucial for a successful heat molding outcome. Mistakes can lead to a poor fit, damaged boots, or even injury. Knowing these pitfalls beforehand will save you time, money, and frustration.
Most errors stem from impatience or using incorrect techniques. Careful preparation and adherence to the process are your best defenses. Let’s examine the most frequent missteps skaters make.
Critical Errors in the Heating Phase
The heating phase is where irreversible damage most often occurs. Applying too much heat or heat in the wrong way compromises the boot’s structure. This undermines both fit and safety.
Be vigilant to avoid these heating mistakes:
- Overheating: This is the #1 error. Boots should be warm and pliable, not hot. If the exterior is too hot to touch comfortably, the interior is dangerously hot.
- Uneven Application: Holding the hairdryer in one spot creates a weak point. Always keep the dryer moving in a slow, steady motion for consistent warmth.
- Heating the Sole: Focus heat on the upper boot and interior. Applying direct heat to the sole can weaken the bond between the sole and the boot.
Mistakes During the Molding and Cooling Process
Even with perfect heating, errors in the molding stage can ruin the custom fit. This phase locks in the shape, so your posture and patience are key. Rushing through cooling is a common failure point.
Ensure you sidestep these molding pitfalls:
- Lacing Too Loosely: You must lace the warm boot as tightly as you would for skating. Loose lacing results in a vague, ineffective mold that won’t eliminate slippage.
- Sitting Down While Cooling: Sitting changes the angle of your ankle and the pressure on your heel. Always stand and walk gently with skate guards on for the full 15-20 minute cooling period.
- Only Molding Once: For severe pressure points, a second, more targeted molding session after 1-2 weeks of skating can further refine the fit. Don’t assume one session is always enough.
Post-Molding Care and Assessing Your Results
Your work isn’t finished once the boots have cooled. Proper aftercare ensures the mold sets permanently and your skates break in correctly. You also need to objectively assess whether the process was successful.
This phase bridges the gap between the molding session and your first real skate. It involves both immediate actions and a short evaluation period. Follow these steps to lock in your custom fit.
Immediate Aftercare for a Lasting Mold
What you do in the 24-48 hours after molding is crucial. The materials are still settling into their new shape. Avoid actions that could distort the fresh mold before it fully stabilizes.
Adhere to these post-molding care instructions:
- Let Them Rest: Do not skate in the boots for at least 24 hours. This allows all materials to fully cool and cure in the molded shape.
- Store Them Properly: Keep the skates at room temperature, away from direct heat sources or cold drafts. Use a boot tree or cedar shoe insert to maintain shape and absorb moisture.
- Initial Skate Session: For your first skate, limit the session to 30-45 minutes. This allows your feet to adjust to the new fit without over-stressing the boots or your skin.
How to Know If Your Heat Molding Was Successful
A successful mold yields tangible improvements in comfort and performance. You should notice specific changes compared to the pre-molded state. Evaluate your results against these clear benchmarks.
Look for these positive signs of a good custom mold:
- Heel Lock: Your heel should feel firmly held in place with minimal vertical slippage when you bend your knees.
- Even Pressure: There should be no intense, pinpoint pain. Pressure should feel firm and distributed evenly around your foot and ankle.
- Reduced Break-In Time: The typical multi-week break-in period should be drastically shortened. Comfort should improve significantly after just a few outings.
If you still experience sharp pain or slippage, the mold may be incomplete. Consider a second, targeted molding session or consult a professional fitter for further adjustments like spot punching.
Advanced Tips and When to Seek Professional Help
Mastering basic heat molding opens the door to advanced customization techniques. These pro-level tips can solve specific, stubborn fit issues. However, it’s equally important to recognize when a problem is beyond DIY fixes.
Knowing your limits protects your investment and your feet. Some skate materials and foot anatomies require expert intervention. Let’s explore advanced strategies and clear red flags.
Pro Techniques for Stubborn Fit Issues
For persistent pressure points or unique foot shapes, standard molding may need enhancement. These methods target specific areas without remolding the entire boot. They require more precision and patience.
Consider these advanced customization strategies:
- Spot Heating with a Socket: For a single bony prominence, heat the exterior of the boot at that spot with a hairdryer. Then, use the rounded end of a hockey puck or socket wrench to gently press and stretch the material from the inside.
- Double Sock Method for Volume: If boots are slightly too roomy after molding, wear two thin skating socks during the heating process. This takes up more volume for a tighter final mold.
- Freeze Technique for Stretching: For a targeted stretch, fill a sealed plastic bag with water, place it in the tight spot, and freeze the boot overnight. The expanding ice gently stretches the material.
Clear Signs You Need a Professional Skate Fitter
Some problems indicate a fundamental mismatch between your foot and the boot. No amount of home heat molding can correct a poor base fit. Seeking expert help early can save you from chronic pain and costly mistakes.
You should visit a professional skate shop if you encounter:
- Severe, Localized Pain: Sharp pain on a bone (like the navicular or 5th metatarsal) often requires a specialized “punch” tool to stretch that one spot, which home tools cannot do.
- Numbness or Tingling: This signals nerve compression, usually from a boot that is too narrow or shallow. A fitter can assess if the boot can be stretched or if a different last width and model is needed.
- The Boot is Simply Wrong: If your foot is swimming in the boot or spilling over the sole, heat molding won’t help. You may need a different size or style, like the Jackson Ultima Softskate for a different fit profile.
Frequently Asked Questions About Heat Molding Skates
Even with a detailed guide, specific questions often arise. This FAQ section addresses the most common concerns skaters have before and after the molding process. Clear answers help build confidence and ensure success.
These questions cover safety, material limitations, and troubleshooting. Understanding these nuances prevents mistakes and sets realistic expectations for your custom fit results.
Best Tools for Heat Molding Skates – Detailed Comparison
Having the right tool makes heat molding safer and more effective. While a hairdryer works, specialized equipment provides superior, even heat. Here are three top-rated products that excel at preparing your boots for a custom fit.
PEET Original Electric Shoe & Boot Dryer – Best Overall Choice
The PEET Dryer is the ideal all-in-one solution for skaters. Its gentle, forced-air circulation provides uniform warmth perfect for molding, and it doubles as a dryer to eliminate odor and moisture after skating. The durable metal construction ensures years of reliable use for all your footwear.
- SILENT, ALWAYS-ON DRYING: The Original PEET uses a patented DryPort system…
- DRIES MOST FOOTWEAR OVERNIGHT: Safe, gentle airflow reaches the inside of…
- EXPAND YOUR DRYING SYSTEM: Compatible with PEET Helmet DryPort, Glove…
DryGuy Force-10 Boot Dryer – Best for Fast, Even Heat
For quicker results, the DryGuy Force-10 offers powerful airflow and adjustable heat settings. It efficiently warms both boots simultaneously, ensuring a consistent mold. The flexible hoses direct heat precisely into the toe and heel areas, making it excellent for tackling stubborn, stiff spots in new boots.

- SAFE & EFFECTIVE DRYING – Safe to use on nearly any type of material, the…
- QUICK DRY PROCESS – Central forced-air blower circulates air evenly…
- NO DISRUPTIVE NOISE – Whisper-quiet rotary blower operates silently to…
Dr. Scholl’s Ultra Sweat-Absorbing Foot Powder – Best Supporting Product
While not a heater, this powder is a highly recommended accessory for the molding process. Applying it to your feet before molding reduces friction, prevents blisters, and absorbs moisture. This ensures your foot slides smoothly into the warm boot and helps maintain a hygienic interior post-mold.

- Contains 6 powerful odor & wetness fighters
- Maximum sweat absorption
- Dr. Scholl’s Odor-x Sweat Absorbing Foot Powder with SweatMax technology…
Conclusion: Mastering Your Custom Skate Fit
Heat molding figure skate boots is the definitive solution for achieving professional-level comfort. It eliminates painful break-in periods and creates a precise, supportive fit. This process maximizes your performance potential by ensuring your equipment works with you, not against you.
The key takeaway is to prioritize patience and precision over speed. Whether you choose DIY or professional molding, following the correct steps protects your investment. Always start with a well-fitted boot for the best results.
Now that you understand the process, take action to transform your skating experience. Gather your tools, review the steps, and give your skates the custom fit they deserve. Your more comfortable and confident skating journey begins today.
Frequently Asked Questions about Heat Molding Figure Skates
What is the best way to heat mold figure skates at home?
The best DIY method uses a hairdryer with multiple heat settings. Heat each boot’s interior for 3-5 minutes, moving the dryer constantly for even warmth. Immediately lace the warm boots tightly and stand in them for 15-20 minutes as they cool to set the custom shape.
For superior results, use a specialized boot dryer with a heat function. This provides more consistent, circulating warmth than a standard hairdryer. Always wear your skating socks and use skate guards while walking during the cooling phase.
Can you heat mold skates more than once?
Yes, you can safely heat mold most skate boots 2-3 times over their lifespan. A second molding is common after a few weeks to fine-tune fit. Each reheating slightly breaks down internal materials, so avoid excessive sessions.
If you need more than three molds, the boot likely has a fundamental fit issue. Repeated molding cannot fix a boot that is the wrong size or width for your foot. Consult a professional fitter for assessment.
What should you do if your skates hurt after heat molding?
Stop skating immediately if pain increases after molding. This indicates an error or a poor base fit. Assess if the boots are too tight overall or if a new, specific pressure point has formed.
For minor issues, a second targeted molding session may help. For sharp or nerve pain, seek a professional fitter. They can perform spot stretching or “punching” that home tools cannot achieve safely.
How long does it take for heat molded skates to break in?
Properly heat molded skates dramatically reduce break-in time. While traditional breaking can take weeks, molded skates typically require only 1-3 skating sessions to feel comfortable. The mold accelerates the process but doesn’t eliminate it completely.
Your feet still need to adapt to the new pressure points and support. Start with short, gentle sessions of 30-45 minutes. Gradually increase intensity over several outings for the best adaptation.
Is it better to heat mold skates at home or at a pro shop?
For mid-range boots and minor adjustments, home molding is cost-effective and convenient. For high-end skates with advanced foams or persistent fit issues, professional shop molding is superior. Shops use precise ovens and expert insight.
Professional molding ensures even heat distribution and allows for additional services like spot punching. If you are a beginner unsure of the correct fit feel, starting with a pro mold is a wise investment in comfort.
What temperature is safe for heat molding figure skates?
There is no single safe temperature, as it depends on your heat source and boot materials. The key rule is the boot should be warm and pliable, not hot. If the exterior is too hot to touch comfortably, the interior is dangerously hot.
Professional ovens typically operate between 160-180°F (71-82°C). With a hairdryer, use a medium setting and keep it moving. The goal is to soften the internal padding, not to melt or scorch any materials.
Can heat molding damage my figure skates?
Yes, improper heat molding can cause permanent damage. Using excessive heat from an open flame, kitchen oven, or high-setting heat gun can delaminate the boot, melt stitching, or warp the sole. Overheating breaks down the boot’s structural integrity.
To avoid damage, never leave the heat source in one spot. Always keep it moving and test the interior temperature with your hand. Follow manufacturer guidelines if available, and when in doubt, seek professional help.
Do all figure skate brands recommend heat molding?
Most major brands designing boots for intermediate to advanced skaters recommend or design their boots for heat molding. Brands like Jackson, Riedell, Edea, and SP-Teri use thermoformable materials in their mid and high-level models specifically for this purpose.
Always check the manufacturer’s instructions for your specific model. Some very low-end recreational skates use materials that do not react well to heat. The product manual or brand website will provide the definitive answer for your skates.
Can You Heat Mold Any Figure Skate Boot?
Not all skate boots are created equal when it comes to heat molding. The ability to mold depends heavily on the boot’s construction and materials. Most modern mid-range and high-end boots are designed with this process in mind.
Here’s a quick breakdown of what can and cannot be molded:
- Yes, Moldable: Boots with leather, synthetic leather uppers, and thermoformable foam padding inside. Most boots from brands like Jackson, Riedell, and Edea in the intermediate level and above.
- Use Caution: Very low-end, vinyl-based recreational skates. The materials may not react well to heat and could warp or melt.
- Check First: Always refer to the manufacturer’s instructions for your specific model. Some advanced boots require precise oven temperatures only a shop can provide.
How Many Times Can You Heat Mold Skates?
You can safely heat mold most skate boots 2-3 times over their lifespan. Each reheating slightly breaks down the internal foams and adhesives. Therefore, you should be strategic and intentional with each session.
Follow this logic for repeat molding:
- First Mold: Initial custom fitting when the boots are new.
- Second Mold: A minor adjustment after 2-3 weeks of skating to address any remaining pressure points.
- Third Session: Rare. Possibly to adjust for foot growth (in youths) or a significant change in sock thickness.
Avoid repeated molding attempts to fix a fundamentally poor fit. If two molds don’t solve the pain, the boot is likely wrong for your foot.
What If My Skates Feel Worse After Molding?
If discomfort increases after molding, stop skating immediately. This indicates an error in the process or a pre-existing fit issue. Continuing can cause injury and set the boot in a painful shape.
Diagnose the problem using this checklist:
- Too Tight? You may have laced too tightly during cooling, over-compressing the padding. Try a remold with slightly less aggressive lacing tension.
- New Pressure Point? The mold may have shifted padding into a new, uncomfortable position. A professional fitter can often correct this with spot work.
- Boot Breakdown? In very old skates, heat can accelerate the breakdown of broken-down padding. The boot may simply be past its usable life.