Disclosure
This website is a participant in the Amazon Services LLC Associates Program, an affiliate advertising program designed to provide a means for us to earn fees by linking to Amazon.com and affiliated sites.
How do you inspect your figure skates for safety? A thorough pre-session inspection is your most critical step. This simple habit prevents accidents and costly damage.
Neglecting your skates risks blade failure, boot breakdown, and serious injury. Our complete guide provides the expert, proven methods used by coaches and pros.
The Hidden Dangers of Worn-Out Skates
Many skaters overlook subtle signs of wear until it’s too late. A loose screw or a tiny crack can lead to catastrophic failure on the ice. This puts you at risk for painful falls, ankle injuries, and ruined performances.
The solution is a systematic, 60-second inspection routine. Catching problems early saves your skates and protects your safety. It transforms guesswork into confident, proactive skate care.
Essential Tool for a Secure Blade
A proper inspection starts with the right tool. You cannot reliably check blade screws with your fingers alone. A dedicated skate tool ensures every component is tight and secure.
We recommend the OAOJUBR Skate Tool. This compact key is designed specifically for figure and hockey skates.
- Fits all standard blade and holder screws.
- Includes a blade guard groove cleaner.
- Durable, rust-resistant construction for a skate bag.
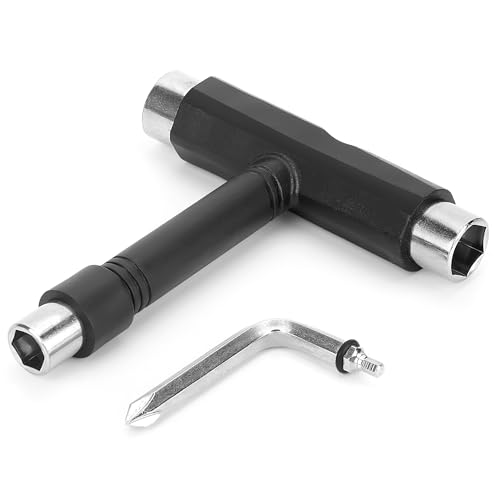
- 【Multi -functional tool】It is a multi -function skateboarding tool that…
- 【Integrated Design】It combines T-type (3/8″, 1/2″, 9/16″) and…
- 【Lightweight and Portable】A sliding cross -type screw knife can be…
Check current price on Amazon →
When a Quick Fix Isn’t the Solution
If your inspection reveals deep rust, a broken sole, or a severely dull blade, simple maintenance won’t suffice. These are signs of advanced wear or an improper initial fit.
Persistent problems often mean your skates no longer support your skill level. It may be time to consider a new pair that matches your current needs. For guidance, explore our curated list of the most comfortable and supportive ice skates on the market.
If you’re experiencing specific issues like cold feet or need versatility, our guides on the best skates for warmth and best skates for indoor and outdoor use offer targeted solutions.
The Pre-Skate Safety Checklist: A Step-by-Step Guide
Follow this systematic inspection routine before lacing up. It covers every critical component of your figure skates. A thorough check takes less than two minutes but is invaluable for safety.
This process helps you identify wear before it causes a problem. Consistent inspections also extend the lifespan of your equipment. Make it as routine as putting on your gloves.
Inspecting Your Blades and Mounting
Your blades are your direct connection to the ice. Any issue here dramatically affects stability and control. Begin by examining the steel and its attachment.
- Check Screws: Use your skate tool to ensure all blade and holder screws are snug. Loose screws are a leading cause of blade detachment.
- Examine the Edge: Run a fingernail lightly down the sharp edge. It should catch consistently. Dull or uneven spots feel smooth and require professional sharpening.
- Look for Rust & Nicks: Inspect for surface rust or deep nicks in the steel. Small rust spots can be cleaned, but major pitting compromises the blade’s integrity.
Evaluating the Boot Structure and Support
The boot provides the foundational support for your ankles and feet. Compromised structure leads to poor performance and injury risk. Pay close attention to these areas.
First, visually inspect the sole and heel for separation from the boot upper. Even a slight gap can widen quickly. Squeeze the sides of the boot to check for excessive softness or breakdown.
Next, examine the tongue, lining, and stitches. Look for torn stitching, especially at stress points. Feel inside for worn-out patches or exposed hardware that could cause blisters.
| Problem | Potential Risk | Recommended Action |
|---|---|---|
| Soft, collapsing sides | Lack of ankle support, instability | Consider boot replacement |
| Sole separating from upper | Loss of power transfer, water damage | Immediate repair by a skate technician |
| Deep crease across the ankle | Boot is broken down, support is gone | Plan for new skates soon |
How to Check Figure Skate Laces and Accessories
Laces and accessories are often overlooked in safety checks. Yet, a snapped lace or faulty guard can cause a dangerous fall mid-session. This section ensures your skates’ supporting components are secure.
Properly functioning accessories are crucial for on-ice performance and off-ice protection. A systematic inspection here completes your pre-skate safety ritual. Don’t let a small detail undermine your hard work.
Lace Integrity and Proper Lacing Technique
Your laces bear tremendous tension and friction. Inspect them thoroughly from aglet to aglet before each use. Focus on areas that rub against hooks and eyelets.
- Check for Fraying & Weak Spots: Run the lace between your fingers. Feel for thinning, severe fraying, or any cuts. Replace laces at the first sign of significant wear.
- Examine the Aglets (Tips): Ensure the plastic or metal ends are intact. Damaged aglets make lacing difficult and can shred eyelet material.
- Use a Secure Lacing Pattern: Lace in a criss-cross pattern, pulling evenly. Avoid wrapping laces around the ankle, as this restricts blood flow and support.
Inspecting Guards, Soakers, and Blades Covers
These accessories protect your blade investment off the ice. Damaged guards can scratch or dull your edges, while wet soakers promote rust.
First, check your hard guards (for walking). Look inside for embedded debris like sand or gravel that can grind against the steel. Ensure the rubber tread is not worn smooth, creating a slipping hazard.
Next, inspect your soft soakers (for absorbing moisture). They must be completely dry before use. Damp soakers trap moisture against the blade, accelerating rust formation. Replace them if they are torn or no longer absorbent.
Maintenance Schedule and Professional Service Signs
A daily visual check is essential, but some maintenance follows a strict schedule. Knowing when to act prevents minor issues from becoming major repairs. This timeline protects your investment and performance.
Some tasks require a trained skate technician’s expertise. Attempting complex repairs yourself can permanently damage your skates. Learn to recognize the signs that it’s time for a pro.
Creating Your Personal Skate Care Calendar
Consistent, scheduled maintenance is the hallmark of a serious skater. It goes beyond the pre-session inspection to preserve your equipment.
Follow this basic timeline to keep your skates in competition-ready condition:
- After Every Session: Wipe blades dry, use absorbent soakers, and air out boots. This prevents rust and odor.
- Weekly: Deep clean boot exteriors with appropriate products. Check for loose stitches or new wear patterns.
- Every 20-40 Hours of Ice Time: Get a professional sharpening. Frequency depends on ice conditions, skill level, and personal preference.
| Task | Frequency | Why It Matters |
|---|---|---|
| Blade Sharpening | 20-40 Ice Hours | Maintains grip, control, and consistent edges |
| Hardware Check/Tightening | Monthly | Prevents catastrophic blade or holder detachment |
| Deep Boot Cleaning & Conditioning | Seasonally | Preserves leather, prevents cracking, extends boot life |
When to Visit a Skate Technician
Your daily inspection may reveal problems beyond simple tightening or cleaning. These are clear indicators you need professional service.
Seek a qualified technician immediately if you notice any of the following:
- Severe or Uneven Blade Wear: Deep nicks, flat spots, or a visibly uneven hollow require a professional sharpening machine to correct.
- Structural Boot Damage: This includes a separated sole, cracked heel, or broken-down ankle support that squeezes flat.
- Permanent Foot Pain or Blisters: Persistent hot spots may indicate a need for professional punching, stretching, or custom orthotic work.
Common Inspection Mistakes and How to Avoid Them
Even diligent skaters can make errors during their safety check. These oversights create a false sense of security. Recognizing common pitfalls is key to a truly effective routine.
This section highlights frequent inspection mistakes from blade care to boot assessment. Learn what to look for and correct your technique. Elevate your pre-skate ritual from a habit to a guarantee.
Overlooking Blade Rust and Moisture Damage
Rust doesn’t always appear as obvious orange flakes. Early-stage moisture damage is subtle but destructive. It weakens the steel and ruins your blade’s polish.
- Mistake: Only checking for major rust. Solution: Look closely for tiny pitting, a cloudy finish, or discoloration along the edge, especially near the toe pick.
- Mistake: Putting guards on wet blades. Solution: Always wipe blades bone-dry with a soft cloth before using absorbent soakers. Hard guards trap moisture.
- Mistake: Storing skates in a closed, damp bag. Solution: Remove skates from your bag after practice to air out. Use a dedicated skate dryer or stuff boots with newspaper.
Misdiagnosing Boot Breakdown and Fit Issues
It’s easy to confuse normal breaking-in with structural failure. Similarly, pain is often blamed on “breaking in” when it signals a poor fit.
First, understand that a flexible crease across the ankle is normal. A sharp, deep crease where the boot collapses completely is a sign of breakdown. If the boot folds over easily with hand pressure, support is gone.
Second, blisters and pain after the break-in period are not normal. They often indicate pressure points that need professional modification. Don’t suffer through pain assuming it will get better; consult a fitter for possible stretching or punching.
Advanced Tips for Coaches and Serious Competitors
For those pushing the limits of the sport, standard inspections are just the start. High-level jumps, spins, and training volume demand next-level skate care. This section delves into proactive maintenance for peak performance.
Elite skaters and their coaches must anticipate wear before it happens. Implementing these advanced strategies minimizes mid-season disruptions. It ensures your equipment is as prepared as you are.
Proactive Wear Monitoring for High-Impact Elements
Specific elements place unique stress on skate components. Track your element training to predict and inspect for targeted wear.
- Toe Jumps (Toe Loop, Flip, Lutz): Inspect the toe pick and its mounting screws weekly. Look for loose picks or cracks in the solder. This area absorbs massive impact.
- Deep Edge Spins and Footwork: Check for accelerated wear on the stanchions (blade posts) and the inside/outside edges. Asymmetric sharpening wear is common.
- High-Volume Training Days: Perform a mid-session visual check of screws and laces. The vibration from repeated landings can loosen hardware faster.
Pre-Competition and Travel Inspection Protocols
Competition and travel introduce new variables. Your inspection must adapt to ensure reliability under pressure and in unfamiliar environments.
Create a pre-competition checklist to be completed the night before. This includes a full structural check, verifying spare laces and tools are packed, and applying a final light coat of blade oil if traveling to humid climates.
When traveling by air, always carry your skates in your carry-on luggage. Checked baggage exposes them to extreme cold, pressure changes, and rough handling that can misalign blades or damage boots. Perform a full re-inspection immediately upon arrival at your destination.
Building a Skate Safety Kit for On-the-Go Repairs
A thorough inspection is useless if you can’t address minor issues immediately. A well-stocked skate safety kit empowers you to handle common problems rinkside. This prevents a small hiccup from ruining your training session.
Your kit should be compact, organized, and live in your skate bag. Think of it as a first-aid kit for your equipment. Being prepared builds confidence and demonstrates professionalism.
Essential Items for Your Skate Bag
This curated list covers the most frequent on-ice equipment emergencies. You can assemble it easily with items from a hardware store and skate shop.
- Multi-Tool or Dedicated Skate Tool: For tightening blade, holder, and toe pick screws. This is your most important item.
- Extra Pair of Laces: Keep a spare set, still in the package, to stay clean and tangle-free.
- Super Glue (Cyanoacrylate): For temporary fixes on detached sole edges or loose hook backings. Note: This is a temporary fix until professional repair.
- Small Roll of Hockey Tape or Clear Tape: Can secure a fraying lace end or temporarily hold a guard in place.
- Soft Cloth and Blade Oil: For a quick dry-and-protect routine if you get caught in damp conditions.
How to Perform a Basic Rinkside Tightening
If your inspection reveals a loose screw during a session, don’t panic. Follow these steps for a safe, quick fix.
First, find a stable, well-lit area off the ice, like a bench. Use your multi-tool to firmly tighten the loose screw. Be careful not to overtighten, as this can strip the thread or crack the holder.
After tightening, re-check all other screws on that skate as a precaution. Once complete, perform a quick visual and tactile check of the area before returning to the ice. If the problem persists or involves structural damage, stop skating and seek a technician.
Teaching Young Skaters to Develop Safe Habits
Instilling a safety-first mindset begins at the earliest stages of skating. Young skaters can and should learn to take ownership of their equipment care. This builds responsibility and deepens their connection to the sport.
Make the inspection process simple, engaging, and part of their pre-ice ritual. Use clear, age-appropriate language and turn it into a game. A good habit formed early lasts a lifetime.
Creating a Fun, Simple Checklist for Kids
Transform the inspection from a chore into a mission. Use visual aids and positive reinforcement to guide them.
- The “Blade Detective”: Give them a soft cloth and have them “find the sparkle” by wiping the blade clean, checking for rust or big nicks along the way.
- “Squeaky Screw” Test: Let them use the skate tool (with supervision) to gently check if screws are “sleeping tight.” Teach them not to force it.
- “Lace Race”: Have them run their fingers down each lace like it’s a racetrack, looking for “bumpy” frayed spots or “broken” aglets.
How Parents Can Supervise and Verify Inspections
Your role is to guide, not do it for them. Supervised practice ensures they learn correctly and don’t miss critical issues.
Start by doing the inspection together, verbalizing each step. Gradually transition to having the child do it while you watch. Ask guiding questions like, “What are we looking for on the blade?” or “Show me how you check the laces.”
Always perform a final, quick verification check after they are done, especially for very young skaters. Praise their thoroughness for specific things they found or did correctly. This positive reinforcement makes them want to do a good job every time.
Best Tools for Figure Skate Safety Inspections
Having the right tools makes your pre-session inspection faster, more accurate, and more effective. These three essential products are trusted by skaters, coaches, and technicians for reliable equipment maintenance and safety checks.
OAOJUBR Skate Tool – Best Overall Inspection Tool
This compact, all-in-one tool is specifically designed for skate maintenance. It features multiple wrench sizes to fit blade, holder, and toe pick screws on virtually all figure and hockey skates. Its built-in groove cleaner efficiently removes ice and debris from your blade guards, preventing edge damage. The durable, rust-resistant construction makes it perfect for your skate bag.
- 【Multi -functional tool】It is a multi -function skateboarding tool that…
- 【Integrated Design】It combines T-type (3/8″, 1/2″, 9/16″) and…
- 【Lightweight and Portable】A sliding cross -type screw knife can be…
Lock Laces – Best Lace Replacement
Upgrade your laces with these high-performance, woven nylon speed laces. They offer superior strength and minimal stretch compared to standard laces, providing consistent support. The durable, coated aglets prevent fraying and make lacing quick and easy. Available in various lengths and colors, they are an ideal preventive replacement to avoid mid-session breaks.

- No-tie Lacing System: Turn any pair of lace-up tennis shoes into slip on…
- Stretch Fit Comfort: Our elastic laces conform to your foot for a custom…
- Perfect For Everyone: Lock Laces, originally designed for triathletes to…
All-in-One Skateboard Tool Kit – Best for Rust Prevention
This comprehensive kit is ideal for proactive blade care. It includes a polishing cloth, rust-inhibiting spray, and a protective silicone-treated storage cloth. The formula cleans light rust and leaves an invisible protective coating to fight moisture. Regular use keeps blades looking new, maintains their polish, and extends time between professional sharpenings.

- All-In-One Skateboard Tool Kit & Complete Hardware: This comprehensive set…
- Versatile for Multiple Uses & Users: Designed for installation and…
- Practical Grip Tape Cleaner for Safety: The package includes a 2.76 x 2 x…
Conclusion: Mastering Your Pre-Skate Safety Routine
A thorough figure skate inspection is your first line of defense against injury. This simple, systematic habit protects your investment and your performance on the ice. Consistency is far more important than complexity.
Make this 60-second checklist a non-negotiable part of your skating ritual. Pair it with a well-stocked safety kit and a regular maintenance schedule. Your skates will reward you with reliability.
Start your next session with confidence by implementing these steps today. Share this guide with your skating friends to promote a culture of safety. Now, lace up and skate with assurance.
Frequently Asked Questions about Figure Skate Safety Inspections
How often should I check my figure skates for safety?
You should perform a basic visual and tactile inspection before every single skating session. This quick check takes less than a minute. It catches immediate issues like loose screws or frayed laces.
Additionally, conduct a more detailed inspection weekly. Schedule professional maintenance, like sharpening, every 20-40 hours of ice time based on your skating intensity and feel.
What is the most important part of a skate to check?
The blade mounting and screws are the most critical safety component. A detached blade during a jump or spin can cause a severe fall. Always ensure all screws in the holder and toe pick are securely tightened.
Following this, the structural integrity of the boot, especially the ankle support and sole, is paramount. A broken-down boot fails to protect your foot and ankle from injury.
What should I do if I find a loose blade screw at the rink?
If you have a skate multi-tool, tighten the screw firmly on a stable bench. Check all other screws on that skate as a precaution. Do not overtighten, as this can strip the thread.
If the screw is stripped, missing, or you don’t have a tool, do not skate on those skates. Seek help from a coach, rink pro shop, or technician immediately to avoid a dangerous equipment failure.
How can I tell if my skate blades are too dull and need sharpening?
Perform the fingernail test. Lightly drag your fingernail perpendicular across the blade’s sharp edge. A sharp blade will lightly catch and shave a tiny bit of nail. A dull blade will slide smoothly without catching.
On the ice, symptoms include feeling slippery on edges, a loss of grip during pushes, and difficulty holding a clean line on spins. Consistent sharpening is essential for control.
What is the best way to prevent rust on my skate blades?
The golden rule is to never put guards on wet blades. Always wipe them completely dry with a soft, absorbent cloth immediately after skating. Then, use breathable, absorbent soakers (terry cloth blade covers) for storage.
Store your skates in a dry, open area—not a closed, damp bag. For added protection in humid climates, apply a thin coat of blade oil or a rust-inhibiting spray after drying.
When is it time to replace my figure skates instead of repairing them?
Consider replacement when the boot’s structural support is compromised. Key signs include the ankle collapsing inward when you squeeze it, a deep permanent crease where it folds, or a sole that is fully separated from the upper.
If the cost of professional repair approaches 50% of the price of new, properly-fitted skates, replacement is usually the more economical and safer long-term choice.
Can I use hockey skate tools to maintain my figure skates?
Yes, in many cases. A standard skate multi-tool designed for ice skates typically fits the hex screws on both figure and hockey skate holders. The sizing is generally universal for modern mounting systems.
However, ensure the tool fits your specific screws before relying on it. Some high-end figure skate models may use proprietary screw types, so checking compatibility is wise.
How can I teach my child to inspect their own skates safely?
Create a simple, visual checklist with pictures of the blade, boot, and laces. Turn it into a game, like being a “Blade Detective.” Supervise them closely initially, asking guiding questions about what they see and feel.
Always perform a final verification check after they are done. Praise specific, correct actions to build their confidence and reinforce the habit. Making it routine builds lifelong responsibility.