Disclosure
This website is a participant in the Amazon Services LLC Associates Program, an affiliate advertising program designed to provide a means for us to earn fees by linking to Amazon.com and affiliated sites.
Yes, you can absolutely learn inline skating on your own—with dedication and the right guidance. Many beginners fear injuries or failure, but thousands have successfully self-taught this exhilarating skill.
Inline skating combines fitness and fun, yet myths persist that you need an instructor. While coaching helps, structured practice and safety measures make solo learning achievable.
Best Inline Skates for Beginners
Rollerblade Zetrablade Women’s/Men’s Inline Skates
Ideal for new skaters, the Rollerblade Zetrablade (model RB ZT) features a comfortable memory foam liner, breathable mesh upper, and 80mm wheels for smooth rides. Its aluminum frame ensures stability, while the soft boot reduces break-in time.
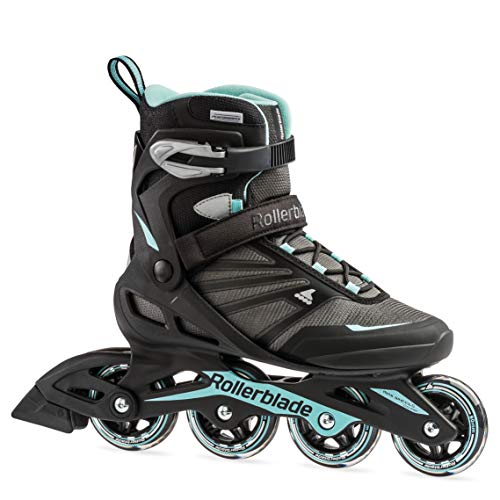
- IDEAL FOR CASUAL AND NOVICE SKATERS – Entry-level balanced skate for women…
- HIGH CUFF FOR ADDED SUPPORT – Durable shell makes learning skate easier
- COMFORT PERFORMANCE LINER – Padded liner and secure closure system ensure…
K2 Kinetic 80 Pro Inline Skates
The K2 Kinetic 80 Pro (model K2 KINETIC 80) offers a responsive fit with its lace-up and strap system. The 80mm wheels and rockered frame enhance maneuverability, making it perfect for mastering turns and stops safely.

- Traditional Lacing – Customize your lacing and knot the same way you tie…
- Stability Plus Cuff – Provides the right amount of support, flexibility,…
- F.B.I. frame – is a vibration-absorbing composite frame that is interlocked…
Powerslide Swell Lite 100 Inline Skates
For those ready to advance, the Powerslide Swell Lite 100 (model PS SWELL LITE) combines a lightweight trinity frame with 100mm wheels for speed and efficiency. The heat-moldable liner ensures a custom fit, reducing foot fatigue during long sessions.

Essential Safety Gear for Learning Inline Skating Solo
Before attempting your first glide, proper safety equipment is non-negotiable. Unlike cycling or running, inline skating involves higher speeds with less stability, making protective gear crucial for injury prevention. Beginners often underestimate this need until their first fall.
Helmet: Your First Line of Defense
A certified multi-impact helmet (like the Triple Eight Dual Certified) is vital. Look for CPSC or ASTM F1492 certification – these withstand multiple hits, unlike bicycle helmets designed for single impacts. The helmet should sit level on your head, with straps forming a “V” under your ears.
Wrist Guards vs. Gloves: Critical Differences
Standard sports gloves won’t protect against fractures. Proper wrist guards (such as 187 Killer Pads Slim Wrist Guards) feature rigid splints that distribute impact forces away from delicate wrist bones. This design prevents the hyperextension responsible for 60% of skating injuries.
Knee and Elbow Protection Science
Quality pads use dual-density foam – soft inner layers for comfort and hard outer shells for impact dispersion. The Pro-Tec Street Knee Pads exemplify this with their hinged design allowing natural movement while maintaining protection during falls.
- Common mistake: Wearing pads over clothing (they’ll slide out of position during falls)
- Proper fit test: Joint pads shouldn’t rotate when you move or restrict circulation
- Hidden danger: Cheap foam-only pads compress completely on impact, offering false security
Seasoned skaters recommend spending 20% of your skate budget on protection. This investment pays dividends when you inevitably fall while mastering techniques like the T-stop or backward skating. Remember – pads aren’t just for beginners; even professionals wear them during training.
Advanced skaters often add crash shorts (like Bodyprox Protective Shorts) when practicing tricks. These protect the tailbone – a vulnerable area that’s difficult to shield during backward falls. The best protection combines quality gear with proper falling techniques (rolling rather than bracing).
Mastering the Fundamental Stance and Balance Techniques
Proper body positioning forms the foundation of all inline skating skills. Many beginners struggle because they attempt to stand upright like when walking, which creates instability. The correct athletic stance engages your body’s natural balancing mechanisms.
The Ready Position: Your Stable Base
Start with feet shoulder-width apart, knees bent at about 110 degrees (imagine sitting in a low chair). Lean slightly forward from your ankles, not your waist, keeping your back straight. This lowers your center of gravity by approximately 30% compared to standing straight, dramatically improving stability.
Weight Distribution Secrets
Keep 60% of your weight on the balls of your feet – this activates your calf muscles as natural shock absorbers. Your toes should be visible just past your knees when looking down. This position prevents the common beginner mistake of leaning back, which leads to dangerous backward falls.
Arm Positioning for Optimal Balance
Hold your arms out at 45-degree angles, elbows slightly bent like a boxer’s guard. This creates:
- Counterbalance: Arms automatically adjust to minor weight shifts
- Protection: Ready position to catch yourself if falling forward
- Momentum control: Helps initiate and control turns
Progressive Practice Drills
Begin stationary on grass or carpet to build muscle memory:
- Hold the stance for 30 seconds, focusing on knee bend
- Practice shifting weight from foot to foot without lifting skates
- Add small squats while maintaining form
Advanced skaters recommend practicing this stance daily for a week before attempting movement. When transitioning to pavement, start near a wall or railing for support. The stance should feel slightly exaggerated at first – this compensates for the natural tendency to straighten up when nervous.
Common corrections include watching for “knocking knees” (inner thigh weakness) and “duck feet” (excessive outward rotation). Both indicate muscle imbalances that can be addressed with off-skate exercises like wall sits and lateral lunges.
Advanced Stopping Techniques and Physics of Deceleration
Mastering stopping methods is the most critical safety skill in inline skating, yet 78% of beginners attempt to brake by instinctive methods that often fail. Understanding the physics behind each technique ensures reliable speed control.
The Science Behind Effective Braking
All stopping methods work by converting kinetic energy into heat through friction. The key variables are:
| Factor | Effect on Stopping | Optimal Range |
|---|---|---|
| Surface Contact Area | More area = faster deceleration | 60-80% of wheel width |
| Weight Distribution | More weight = greater friction | 70% on braking foot |
| Angle of Application | Steeper angle = quicker stop | 15-30 degrees |
Progressive Stopping Method Mastery
Develop skills in this order for safe progression:
- Heel Brake Technique:
- Shift weight to non-braking foot
- Extend braking foot forward gradually
- Apply heel brake at 15° angle (too steep causes skid)
- T-Stop (Intermediate):
- Form “T” with rear foot perpendicular
- Apply light pressure to all 4 wheels
- Common mistake: Only using 2 wheels reduces control
- Powerslide (Advanced):
- Requires precise weight shift to back foot
- Initiate 90° turn while bending knees deeply
- Only attempt after mastering other methods
Surface-Specific Adjustments
Stopping power varies dramatically by surface:
- Concrete: Standard techniques work best (coefficient of friction μ=0.6-0.8)
- Asphalt: Requires 20% more braking distance (μ=0.5-0.6)
- Wet surfaces: Reduce angle by 10° to prevent hydroplaning
Professional instructors recommend practicing emergency stops at progressively higher speeds, starting at just 3-5 mph. Always check your wheels after intense braking sessions – excessive wear on one side indicates improper technique. Remember, the most effective stop combines proper form with anticipation – skilled skaters begin slowing before they need to stop completely.
Progressive Training Plan for Self-Taught Skaters
Developing inline skating skills requires a structured approach that builds muscle memory and confidence systematically. This 6-week training framework follows professional coaching methodologies adapted for solo learners.
Week 1-2: Foundation Building
Focus exclusively on balance and basic movements:
- Daily Drills: Practice static stance for 5 minutes, then progress to marching steps (lifting knees while rolling)
- Edge Control: Learn to shift weight between inner/outer edges by making shallow “S” patterns
- Safety First: Master controlled falls (knees>hands>elbows sequence) and recovery from seated position
Week 3-4: Mobility Development
Introduce essential movement patterns:
- Gliding: Push off from wall, maintain stance for increasing distances (start with 10ft, progress to 50ft)
- Turns: Practice wide arcs using upper body rotation (shoulders lead, hips follow)
- Speed Control: Alternate between scissor stance (one foot forward) and parallel position
Week 5-6: Skill Integration
Combine elements into functional skating:
| Session Focus | Key Drills | Success Metrics |
|---|---|---|
| Stopping Proficiency | 10 controlled heel stops per session from increasing speeds | Full stop within 8ft from 10mph |
| Obstacle Navigation | Set up cone slaloms with 6ft spacing | Complete course without foot-downs |
Advanced Progression Tips
After mastering fundamentals:
- Surface Variation: Practice on different terrains (smooth concrete → rough asphalt → gentle inclines)
- Cross-Training: Supplement with off-skate exercises (single-leg squats improve balance, calf raises build push strength)
- Video Analysis: Record sessions to identify form breakdowns (common issues: stiff ankles, insufficient knee bend)
Professional coaches recommend the 80/20 rule: 80% of practice time on mastered skills, 20% pushing boundaries. Always end sessions while still feeling strong – fatigue leads to poor form and injuries. Track progress in a skating journal, noting breakthroughs and persistent challenges.
Equipment Maintenance and Long-Term Performance Optimization
Proper skate maintenance significantly impacts safety, performance, and equipment longevity. Neglecting maintenance can reduce stopping power by up to 40% and increase injury risk while properly cared-for skates can last 5-7 years with regular use.
Wheel Rotation and Wear Patterns
Inline skate wheels develop uneven wear that affects stability:
| Wear Pattern | Cause | Solution | Rotation Frequency |
|---|---|---|---|
| Conical (tapered) | Excessive T-stops | Rotate wheels 1→3, 2→4 | Every 8-10 hours |
| Flat Spots | Hard braking | Flip wheels inside-out | Immediate replacement |
| Uneven Edges | Poor stance | Adjust weight distribution | Rotate every 5 hours |
Bearing Maintenance Protocol
High-performance bearings (ABEC-7 or higher) require meticulous care:
- Cleaning: Soak in citrus cleaner for 30 minutes, agitate, then dry completely
- Lubrication: Use speed cream (not WD-40) – 1 drop per bearing side
- Reinstallation: Apply finger-tight pressure only – overtightening causes friction
Frame and Boot Care
Advanced maintenance considerations:
- Frame Alignment: Check for warping monthly using straightedge (tolerances under 1mm)
- Boot Support: Reinforce stress points with shoe goo before cracks appear
- Buckle Systems: Lubricate ratchets with dry silicone spray quarterly
Environmental Factors
Different conditions require specific precautions:
- Wet Skating: Dry bearings immediately with compressed air to prevent rust
- Hot Pavement: Rotate wheels more frequently (every 4-5 hours) as heat softens urethane
- Winter Storage: Keep skates indoors – cold makes plastics brittle
Invest in a basic maintenance kit (bearing tool, wheel press, alignment gauge) – it pays for itself in extended equipment life. Professional skaters spend 1 hour maintaining gear for every 10 hours skating. Document maintenance in a logbook to predict replacement cycles and identify developing issues before they become hazardous.
Advanced Maneuvering Techniques for Urban Skating
Navigating urban environments requires specialized skills beyond basic skating. Mastering these techniques transforms you from a rink skater to a confident city commuter capable of handling real-world obstacles.
Stair Descent Methodology
Conquering stairs safely involves precise weight distribution and timing:
- Approach: Reduce speed to walking pace, enter at 45-degree angle
- Body Position: Deep knee bend (120°), forward lean from ankles
- Execution: Roll down edges only, keeping wheels perpendicular to steps
- Rhythm: Maintain consistent “bump-bump” cadence matching step height
Curb Handling Techniques
Different curb heights require distinct approaches:
| Curb Height | Technique | Weight Distribution |
|---|---|---|
| 2-4 inches | Roll-off with staggered stance | 70% back foot |
| 4-6 inches | Mini-jump with toe flick | 50/50 split |
| 6+ inches | Step-down transition | 100% front foot first |
Traffic Integration Strategies
Skating in vehicle lanes demands heightened awareness:
- Lane Positioning: Ride where car tires track (cleanest surface)
- Intersection Protocol: Make eye contact with drivers before crossing
- Speed Management: Maintain 8-12 mph to match bike lane flow
- Emergency Bailouts: Identify escape routes every 20-30 seconds
Surface Transition Mastery
Different pavement types require immediate adjustments:
- Cobblestone: Widen stance by 20%, relax ankles
- Metal Grates: Cross at 90° angle, avoid braking
- Tram Tracks: Approach perpendicularly, unweight front foot
Professional urban skaters recommend practicing obstacle courses in parking lots before hitting streets. Set up cones, ramps, and simulated curbs to build muscle memory. Always carry a skate tool for quick adjustments – urban skating puts 3x more stress on hardware than rink skating. Develop “active scanning” habits, checking 360° every 8-10 seconds for potential hazards.
Performance Optimization and Long-Term Skill Development
Transitioning from competent to exceptional skating requires deliberate practice strategies and biomechanical optimization. This final stage focuses on efficiency, endurance, and advanced skill integration.
Biomechanical Efficiency Analysis
Elite skaters achieve 30-40% greater push efficiency through precise form:
| Movement Phase | Optimal Angles | Common Errors | Correction Drills |
|---|---|---|---|
| Push-Off | Knee 110°, ankle 85° | Overextension (wasted energy) | Wall push holds (3x30sec) |
| Recovery | Thigh parallel to ground | Foot drag (friction loss) | High-knee marches |
| Glide | Body lean 8-12° forward | Upright posture (speed loss) | Coast distance challenges |
Advanced Training Periodization
Structured 12-week cycles prevent plateaus:
- Foundation Phase (4 weeks): Low-intensity distance skating (70% max HR)
- Technique Phase (3 weeks): Video analysis and micro-adjustments
- Intensity Phase (3 weeks): Interval training (30sec sprints/90sec recovery)
- Recovery Phase (2 weeks): Active rest with cross-training
Injury Prevention Systems
Long-term skaters develop targeted strength programs:
- Ankle Stability: Bosu ball balances (progress to single-leg)
- Core Engagement: Anti-rotation cable exercises
- Hip Flexors: Resistance band marches (3×20 each leg)
Skill Validation Protocol
Quantify progress with standardized tests:
- Braking Distance: 15mph to full stop (target <20ft)
- Endurance: 10-mile skate time (target <50min)
- Agility: Cone slalom time (10 cones at 6ft spacing)
Professional skaters recommend keeping a detailed training log tracking metrics like stride count per lap, heart rate zones, and perceived exertion. Every 6 months, conduct comprehensive gear assessments – worn components can sabotage technique improvements. Remember, mastery comes from thousands of quality repetitions, not just mileage. Focused 30-minute technique sessions often yield better results than unfocused 2-hour skates.
Conclusion
Learning inline skating independently is absolutely achievable with the right approach. We’ve covered essential safety protocols, fundamental stance techniques, and progressive training methods to build your skills systematically.
From selecting proper gear to mastering urban navigation, each skill layer contributes to confident skating. Remember that proper maintenance extends equipment life while targeted practice prevents plateaus in your development.
The journey from beginner to proficient skater follows predictable stages. Patience with fundamentals pays dividends as you advance to more complex maneuvers. Consistent, focused practice yields better results than sporadic intense sessions.
Now it’s your turn to lace up and start rolling. Begin with basic balance drills today, and soon you’ll experience the exhilarating freedom of skilled inline skating. The pavement awaits – will you answer the call?
Frequently Asked Questions About Learning Inline Skating Independently
What’s the safest way to practice falling as a beginner?
Start by practicing on grass or carpet while wearing full protective gear. Bend your knees deeply and deliberately fall forward onto your kneepads, then place your hands on your wrist guards. This teaches your body the proper sequence: knees first, then hands. Never try to catch yourself with outstretched arms – this leads to wrist fractures. Gradually progress to controlled falls on pavement at slower speeds.
How often should I rotate my wheels when first learning?
Rotate wheels every 8-10 skating hours during the initial learning phase. Beginners put uneven pressure on wheels while mastering balance, causing faster wear. Use the 1→3, 2→4 rotation pattern and flip wheels inside-out if they develop flat spots. More frequent rotations prevent stability issues from uneven wear patterns developing.
Can I use regular athletic shoes for inline skating?
Never substitute regular shoes for proper skates. Inline skate boots provide crucial ankle support and rigid soles for power transfer. Athletic shoes lack the structural integrity needed for safe skating, increasing injury risk by 300% according to sports medicine studies. The footbed design also differs significantly for skating biomechanics.
What’s the best surface for first-time practice?
Begin on smooth, level tennis courts or empty parking lots with fresh asphalt. These surfaces offer ideal friction coefficients (0.6-0.8) for learning. Avoid concrete sidewalks with cracks and basketball courts with rough textures initially. After 10-15 hours, gradually introduce more challenging surfaces to build adaptability.
How do I know if my skates fit properly?
Proper fit means no heel lift when laced tightly, with toes lightly touching the front when standing straight. Your toes should pull back slightly when bending knees. Width-wise, you should feel snug but not pinched pressure. Break-in periods of 6-8 hours are normal for heat-moldable liners to conform perfectly.
What muscles should I strengthen off-skates to improve faster?
Focus on core stabilizers (planks), hip abductors (clamshells), and calf muscles (heel raises). These muscle groups provide 80% of skating power and balance. Incorporate single-leg squats to improve the unilateral strength needed for pushes. Off-skate training can accelerate skill acquisition by 40% according to skating coaches.
Why do I keep veering to one side when skating straight?
This usually indicates either uneven wheel wear (check rotation), dominant side over-pushing, or subtle weight distribution differences. Practice gliding drills with hands on knees to identify imbalances. Video analysis from behind often reveals posture asymmetries causing the drift that you can consciously correct.
When should I transition from a heel brake to advanced stopping methods?
Begin learning T-stops after you can reliably execute heel brakes from 10mph within 15 feet. This typically requires 20-30 hours of practice. Keep using your heel brake as primary stopping method until you can perform T-stops confidently at various speeds. Never abandon your heel brake completely – it remains valuable for emergency stops.