Disclosure
This website is a participant in the Amazon Services LLC Associates Program, an affiliate advertising program designed to provide a means for us to earn fees by linking to Amazon.com and affiliated sites.
Adjusting figure skates for wide or narrow feet is essential for performance and comfort. A perfect fit prevents blisters and improves edge control. This guide provides the expert methods to customize your boots.
Ill-fitting skates cause pain and hinder your skating progress. Proper width adjustment solves these common problems. It transforms your on-ice experience by ensuring secure, pain-free support.
The Hidden Cost of an Improper Skate Fit
Skates that are too narrow or too wide create more than just discomfort. They directly compromise your safety and skill development. A poor fit leads to pressure points, blisters, and a lack of precise control over your edges.
This instability makes learning new moves difficult and increases fall risk. Many skaters endure the pain, thinking it’s normal. In reality, it’s a sign your boots need adjustment for your unique foot shape.
A Quick Fix: Heat-Moldable Inserts
For minor width discrepancies, aftermarket insoles can be a game-changer. Heat-moldable inserts allow you to customize the interior volume of your boot. They provide targeted cushioning and support where you need it most.
One highly effective product is the Superfeet Yellow Hockey Comfort Insoles. While designed for hockey, their principles apply perfectly to figure skating.
- Thermoformable Foam: Mold to your foot’s contours with a hairdryer for a custom fit.
- Deep Heel Cup: Stabilizes the foot, reducing slippage that causes width issues.
- Targeted Support: Helps fill negative space in boots that are too wide.

- Arch Support for Hockey: Contoured Superfeet shape stabilizes feet,…
- Orthotic Inserts for Arch Support: Flexible heel cradle keeps your heels…
- Arch Support Inserts: Perforated forefoot improves air circulation and…
Check current price on Amazon →
When Adjusting Isn’t Enough: The Right Boot from the Start
If your skates are severely mismatched, no amount of padding will create a perfect fit. The most reliable solution is investing in skates designed for your foot volume from the beginning.
Many top brands offer specific width options. For example, our review of the Riedell Soar skates highlights their multiple width offerings. This is a critical feature for a pain-free experience.
For a broader selection, explore our curated guide to the most comfortable ice skates on the market. It focuses on models built for superior fit. If warmth is also a concern, our list of the best skates for warmth and comfort combines both key needs.
How to Widen Figure Skates for a Better Fit
Widening figure skates is often necessary for those with wide feet or bunions. Professional boot fitters use specialized tools, but you can achieve safe results at home. The key is applying gradual, controlled pressure to specific areas.
This process, known as spot stretching, targets painful pressure points. It creates a custom pocket of space without compromising the boot’s structural integrity. Always proceed slowly to avoid damaging the skate’s materials.
Essential Tools for Safe Boot Stretching
Using the right tools prevents damage and ensures an even stretch. Never use excessive force or household objects that can crease or tear the leather or synthetic materials.
- Boot Stretching Spray: Softens the material for easier manipulation. Apply lightly to the inside and outside of the target area.
- Professional Boot Stretcher: A adjustable tool with bunion plugs that applies precise, outward pressure. This is the gold standard for home adjustments.
- Hairdryer: A heat source to warm stiff materials. Use on a low setting and keep it moving to avoid overheating one spot.
Step-by-Step Spot Stretching Method
Follow this proven method to safely add width to your skates. Patience is crucial for a permanent, effective stretch.
- Identify the Pressure Point: Mark the exact spot on the boot where your foot feels tightest.
- Apply Heat and Conditioner: Warm the area with a hairdryer for 30-60 seconds. Then apply a small amount of stretching spray.
- Insert the Stretcher: Place the tool inside the boot, aligning the bunion plug with your marked spot. Expand the stretcher until you feel firm resistance.
- Let it Rest: Leave the stretcher in place for 24-48 hours. Check the fit and repeat the process if more width is needed.
Key Takeaway: Always stretch in small increments. It’s easier to stretch a boot more later than to fix an over-stretched, baggy fit.
When Professional Fitting is Non-Negotiable
Some situations require a professional’s touch. Attempting complex adjustments yourself can ruin expensive skates or create safety hazards.
Seek a certified boot fitter if you need major width increases or have significant anatomical variations. This includes severe bunions or highly asymmetrical feet. They have industrial-grade equipment to reshape the boot’s entire last.
If your skates are still painfully tight after multiple stretching attempts, the boot may simply be the wrong model for your foot volume. Consider skates built for wider feet from the start.
Solutions for Narrow Feet: Padding and Lacing Techniques
Skates that are too wide cause slippage and a loss of precise control. This is a common issue for skaters with narrow or low-volume feet. The goal is to fill negative space and secure the heel without over-tightening.
Strategic padding and specialized lacing methods are your most effective tools. They create a custom, snug fit that enhances performance and stability. This approach is often safer and more reversible than attempting to permanently narrow a boot.
Strategic Padding for a Snug, Secure Fit
The right padding targets specific areas of empty space. Avoid using thick, generic socks as they can create bunching and reduce sensitivity.
- Heel Grips or Pads: Adhesive pads placed inside the boot’s heel pocket. They prevent heel lift, the primary cause of blisters in loose skates.
- Ankle Bumpers (or Donuts): Foam rings that wrap around the ankle bone. They fill space and provide cushioning while improving lateral support.
- Tongue Pads: Placed on the underside of the skate tongue. These take up volume over the instep and prevent the laces from cutting in.
| Padding Type | Best For | Key Benefit |
|---|---|---|
| Heel Grips | Heel Slippage | Eliminates lift, improves power transfer |
| Ankle Bumpers | Narrow Ankles / Empty Space | Customizes ankle fit, adds comfort |
| Tongue Pads | High Instep / Loose Upper | Secures foot downward, prevents lace bite |
Advanced Lacing Methods to Lock Your Foot In
Lacing technique dramatically affects fit. Standard criss-cross lacing often fails to address width issues. These two proven methods can transform a loose skate.
- Heel Lock Lacing (Runner’s Loop): Creates a secure loop over the instep to anchor the heel down. This is the single most effective change for narrow heels.
- Gap Lacing: Skip eyelets in areas where the boot is too tight (e.g., over the forefoot). This provides relief while allowing you to tighten the ankle area more securely.
Pro Tip: Combine a heel lock lace with a tongue pad for a powerful one-two punch. This addresses both vertical heel lift and horizontal instep volume simultaneously.
Testing Your Adjusted Fit
After adding padding or changing laces, perform a simple test. Bend your knees deeply in a skating posture while laced up.
Your heel should remain firmly planted with zero lift. Your toes should be able to wiggle slightly but not slide forward. If you pass this test, your adjustments for narrow feet are successful.
Choosing Skates with Adjustable Width Features
Some modern skate models are designed with built-in adjustability. These skates offer a more flexible and forgiving fit solution. They are ideal for growing feet or skaters whose needs may change.
This technology often involves heat-moldable shells or adjustable components. It provides a customized fit without permanent alteration to the boot. Understanding these options can prevent future fitting headaches.
Benefits of Heat-Moldable Boot Technology
Heat-moldable skates use specialized materials that soften when heated. They can then be shaped to the contours of your individual foot. This process is typically done by a professional at a skate shop.
- Precise Contouring: The boot forms to your arch, instep, and ankle bones for unparalleled contact.
- Targeted Relief: Specific pressure points, like bunions, can be gently pushed out during the molding process.
- Reduced Break-in Time: The boot is pre-shaped to your foot, minimizing the painful traditional break-in period.
Popular Adjustable and Heat-Moldable Models
Several reputable brands incorporate these user-friendly technologies. They represent a smart investment for skaters prioritizing long-term comfort and fit.
For example, the Lake Placid Nitro 8.8 features a heat-moldable liner for a personalized fit. Our detailed Lake Placid Nitro 8.8 review covers its impressive customization process. Similarly, youth skaters can benefit from the adjustable features of the Lake Placid Summit skates.
Key Consideration: Heat-moldable skates are a premium feature. They are best for intermediate to advanced skaters or those with very specific fit challenges that standard boots cannot address.
Is an Adjustable Skate Right for You?
Consider your skill level, commitment, and budget. Adjustable skates often come at a higher price point but offer significant value.
They are an excellent choice if you have hard-to-fit feet or are between standard widths. They are also wise for growing children to extend the usable life of the boot. For a wider look at comfortable options, see our guide to the best women’s recreational ice skates, many of which prioritize adaptable fit systems.
Always try on multiple models and consult with a fitter. The right technology should solve your problem, not become an unnecessary complication.
Common Mistakes to Avoid When Adjusting Skates
Even with good intentions, skaters can damage their boots or injure themselves. Rushing the process or using improper tools are the most frequent errors. Avoiding these pitfalls saves money and ensures your safety on the ice.
This section highlights critical adjustment mistakes and how to steer clear of them. Learning from others’ errors is the fastest path to a successful custom fit.
Using Excessive Heat or Force
Applying too much heat can permanently damage skate materials. Synthetic materials can melt, and leather can become brittle and crack.
- Overheating with a Heat Gun: Never use a high-power heat gun. A hairdryer on a low/medium setting provides sufficient, safe warmth.
- Forcing a Stretcher: Cranking a boot stretcher too aggressively can create a permanent, baggy “bubble.” It can also separate the sole from the upper.
- Ignoring Material Limits: Very stiff, advanced-level boots are harder to stretch. Forcing them often requires professional intervention to fix.
Neglecting the Break-In Period
New skates require a proper break-in, which is different from permanent adjustment. Confusing the two leads to unnecessary modifications.
Break-in involves the materials softening and conforming to your foot’s general shape through short, gradual wear sessions. Adjustment is a targeted alteration to address a specific, persistent fit issue like a bunion or narrow heel.
Always complete the recommended break-in period (typically 8-12 hours of ice time) before deciding if a permanent adjustment is needed. The pain from stiffness often subsides, while width issues will not.
Warning Sign: If you feel sharp, pinpoint pain or numbness, stop skating immediately. This indicates a serious pressure point that needs addressing, not just breaking in.
Choosing the Wrong Socks or Insoles
Your sock choice is part of your fit equation. Thick, bulky socks are a common crutch for loose skates but reduce feel and control.
- Avoid Cotton Socks: They retain moisture, cause friction, and lose shape. Opt for thin, synthetic skating or performance socks.
- Generic Drugstore Insoles: These often lack the necessary structure and can raise your foot, changing the boot’s fit dynamics. Use insoles designed for skating or athletic support.
- Doubling Up Socks: This creates uneven pressure and bunching, leading to blisters. It is always better to pad the boot, not your foot.
Maintaining Your Custom Fit Over Time
Achieving the perfect fit is only the first step. Preserving that fit ensures long-term comfort and performance. Skates, like feet, can change with use, weather, and time.
Proper skate maintenance and storage are crucial for consistency. Simple habits protect your adjustments and extend the life of your boots. Follow these guidelines to keep your custom fit feeling new.
Proper Drying and Storage Protocols
Moisture is the enemy of skate structure and materials. It causes leather to break down and can lead to permanent stretching or odor.
- Always Remove Insoles: Take out footbeds and liners after each use to allow air to circulate fully inside the boot.
- Use Boot Dryers: Invest in a passive, non-heated boot dryer. It gently circulates air to evaporate sweat without applying damaging heat.
- Store in a Cool, Dry Place: Never leave skates in a hot car or damp bag. Use a breathable skate bag, not a sealed plastic one.
Regular Fit Checkups and Minor Re-Adjustments
Your fit should be reassessed periodically. Feet can swell slightly during long sessions, and padding can compress over time.
- Monthly Inspection: Feel inside the boot for any worn-down padding. Check if heel grips or tongue pads are still securely adhered.
- Re-Tighten Hardware: For skates with adjustable components, ensure all screws or mechanisms are snug and functioning.
- Re-Mold if Necessary: Some heat-moldable liners can be re-heated and re-shaped if the fit becomes loose after a season of use.
Pro Tip: Keep a log of the adjustments you made (e.g., “added 3mm heel pad left boot”). This makes it easy to replace worn components with the exact same thickness and type.
When to Know It’s Time for New Skates
Even the best-maintained skates have a finite lifespan. Over-adjustment can only compensate for so much wear and tear.
Signs you need a replacement include the boot breaking down (ankle collapsing inward) or the sole separating from the upper. If you’re constantly adding new padding to fix new problems, the structural integrity is likely failing.
Upgrading to a new pair that fits correctly from the start is often safer and more cost-effective. For versatile options, explore our guide on the best ice skates for indoor and outdoor use to find a durable successor.
Final Checklist Before Hitting the Ice
After making any adjustments, a systematic final check is crucial. This ensures your modifications are safe and effective. Skipping this step can lead to discomfort or even injury during your session.
Use this definitive checklist to verify your custom skate fit. It covers both static fit and dynamic performance indicators. Pass each point for confidence on the ice.
Static Fit Assessment (Laced Up, Standing)
Perform this check before you step onto the ice. Your skates should feel secure and balanced while standing still.
- Heel Lock Test: Lift your heel. There should be zero up-and-down movement within the boot.
- Toe Check: Your toes should gently brush the front of the boot when standing straight. They should be able to wiggle freely.
- Pressure Point Scan: There should be no sharp, pinpoint pain. Even pressure distribution is the goal.
- Ankle Contact: The sides of the boot should hold your ankles snugly without pinching or gapping.
Dynamic Motion Test (On the Ice)
The true test of fit happens when you move. Perform these basic maneuvers to assess stability and control.
- Deep Knee Bends: Execute several pliés. Your heel must stay firmly planted throughout the entire motion.
- Edge Engagement: Push onto your inside and outside edges. Your foot should not slide laterally inside the boot.
- Basic Stroking: Take a few laps. Pay attention to any shifting, rubbing, or new pressure points that develop with movement.
Success Metric: After 15 minutes of skating, you should be thinking about your technique, not your feet. Lingering discomfort means further fine-tuning is needed.
Post-Session Evaluation
What happens after you skate is just as telling. Your feet will provide clear feedback on the fit’s success.
Remove your skates and socks immediately after your session. Look for severe red marks that last more than 10-15 minutes. These indicate high-pressure areas that need addressing.
Note any blisters, especially on the heels or sides of the feet. This signals friction from slippage. Compare these results to your pre-adjustment sessions to measure your improvement.
Best Tools for Adjusting Figure Skates – Detailed Comparison
Having the right tools makes customizing your skate fit safe and effective. These three products are trusted by skaters and professional fitters alike. Each serves a distinct purpose in solving width and volume issues.
UNIKOO Shoe Stretcher – Best Overall Tool
This adjustable tool is essential for spot stretching. It features multiple bunion plugs to target specific pressure points on the boot’s exterior. Its durable metal construction provides controlled, even pressure without damaging the skate’s material.

- ⚠【PLEASE NOTE】This boot stretcher suitable for Wm’s Size 10-14; M’s…
- 【Keep Your Shoes in Great Condition】Regular use of the boot stretcher…
- 【Professional Wide Feet Solution】Say goodbye to uncomfortable shoes!…
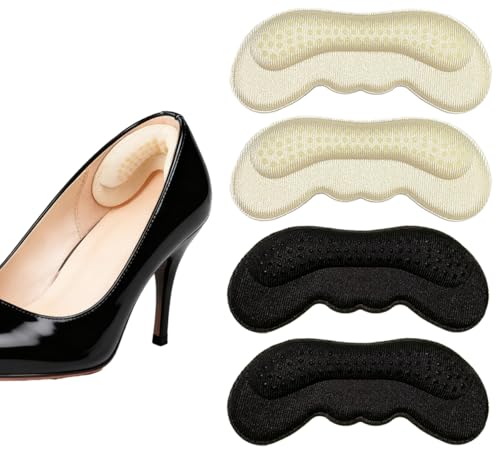
Superfeet Yellow Hockey Comfort Insoles – Best for Volume Adjustment
These premium insoles are thermoformable to create a custom footbed. The deep heel cup stabilizes the foot, reducing slippage in wide skates. They also provide excellent arch support, improving overall comfort and power transfer.
- Arch Support for Hockey: Contoured Superfeet shape stabilizes feet,…
- Orthotic Inserts for Arch Support: Flexible heel cradle keeps your heels…
- Arch Support Inserts: Perforated forefoot improves air circulation and…
Kimile Heel Pads – Best for Narrow Heels
These adhesive foam pads are the simplest solution for heel lift. They add 3mm of padding to the boot’s heel pocket, taking up excess volume instantly. Easy to install and trim, they eliminate blister-causing friction without permanent alteration.
- 【All-Day Comfort & Protection】Experience lasting comfort with our heel…
- 【Super Strong & Traceless Adhesive】Our heel cushion pads feature…
- 【Universal Fit for Most Shoes】One size fits most! Perfect for adjusting…
Conclusion: Achieving Your Perfect Figure Skate Fit
Adjusting your figure skates for wide or narrow feet is a transformative skill. It unlocks comfort, control, and confidence on the ice. The methods outlined provide safe, effective solutions for most common fit issues.
The key takeaway is to proceed gradually and test thoroughly. Whether stretching, padding, or using specialized tools, patience ensures success. Always prioritize the structural integrity of your boot.
We encourage you to revisit the relevant section and begin with one adjustment at a time. Share your fitting success stories or questions in the comments below. Your perfect, pain-free skating experience is within reach.
Frequently Asked Questions about Adjusting Figure Skates
What is the best way to stretch figure skates at home?
The safest method is spot stretching with a professional boot stretcher. Apply a boot stretching spray to the targeted area and insert the tool. Expand it gradually until you feel firm resistance, then leave it for 24-48 hours.
Always use a hairdryer on low heat to warm stiff materials first. Never force the stretch, as this can damage the boot’s structure. Repeat the process in small increments until the desired width is achieved.
How can I make my ice skates tighter if they are too wide?
Use strategic padding to fill negative space inside the boot. Adhesive heel grips and ankle bumpers are highly effective for this. They take up volume without compromising the boot’s external structure.
Also, implement a heel lock lacing technique. This creates a secure loop that anchors your foot back and down. Combining padding with advanced lacing solves most width-related slippage issues.
Can all figure skates be stretched for width?
Most leather and synthetic boots can be stretched modestly. However, very stiff, high-level skates made with advanced composites are much more resistant. Attempting to stretch these often requires professional equipment and expertise.
Always check with the manufacturer or a certified fitter first. Some modern heat-moldable skates offer a better alternative, as they are designed to be custom-formed to your foot’s shape.
What is the difference between breaking in and stretching skates?
Breaking in is the natural process of the materials softening and conforming to your foot’s general shape through wear. Stretching is a targeted, permanent alteration to the boot’s structure to address a specific fit issue like a bunion.
You should always complete the break-in period (8-12 hours) before deciding to stretch. Pain from stiffness often subsides, while a true width problem will persist and require adjustment.
Why do my toes go numb even though my skates feel loose?
This counterintuitive problem is often caused by over-tightening the laces over the instep. You may be cranking the laces to compensate for a wide heel, which cuts off circulation to the forefoot.
The solution is to pad the heel to secure it, allowing you to lace the middle of the boot more loosely. Ensure your toes are relaxed and not curled, as clawing can also cause numbness.
How much does it cost to get skates professionally stretched?
Costs vary by region and shop, but a basic spot stretch typically ranges from $15 to $40 per boot. More complex stretching or punching out multiple areas will cost more. A full heat-molding service is a premium option, often between $50 and $100.
While an investment, professional work guarantees the job is done correctly without risking damage to your expensive equipment. It is highly recommended for significant adjustments.
What are the signs that my skates cannot be adjusted and need replacing?
If the boot’s ankle collar has broken down and collapsed inward, it cannot be fixed. Other signs include the sole separating from the upper or the boot feeling structurally “dead” and unsupportive despite padding.
When you are constantly adding new padding to fix new problems, the boot’s integrity is likely failing. At this point, investing in a new, properly fitted pair is the safest and most effective path forward.
Are adjustable or heat-moldable skates worth the extra money?
For skaters with hard-to-fit feet, they are absolutely worth the investment. These technologies provide a precise, custom fit from the start, drastically reducing break-in pain and improving performance.
They can also extend the usable life of the skates for growing children. For recreational skaters with standard feet, a well-fitted traditional boot may be perfectly sufficient and more cost-effective.
Can I Make My Child’s Skates Wider as They Grow?
Limited stretching is possible, but it is not a long-term growth solution. Skates stretched beyond ¼ of a size can lose structural support.
For growing feet, prioritize adjustable youth skates or models with removable liners. Our review of the Jackson Ultima Classic SoftSkate highlights its flexible fit for developing skaters. It’s safer to use thicker socks or insoles temporarily before sizing up.
Never buy skates multiple sizes too big. This creates control and safety issues. It’s better to trade in or sell skates more frequently for a proper fit.
How Do I Fix One Foot Wider Than the Other?
Asymmetrical feet are very common. The solution is to treat each skate as an individual fitting project.
- Stretch One Boot Only: Use a spot stretcher on the wider foot’s boot at the specific pressure point.
- Use Asymmetrical Padding: Add a heel grip or tongue pad only to the narrower foot’s skate to take up extra volume.
- Consider Different Socks/Insoles: A slightly thicker sock on the narrower foot can help balance the feel.
Golden Rule: Always fit for the larger foot first. It is much easier to pad a skate to fit a smaller foot than to stretch one for a larger foot.
Are Lace Bite and Numb Toes Related to Width?
Yes, both are often symptoms of improper width distribution. They indicate pressure in the wrong places.
Lace bite (pain on the front of the ankle) often occurs when skates are too wide over the instep. The foot sinks down, forcing the laces and tongue into the ankle. A tongue pad can lift the foot and alleviate this.
Numb toes can happen if skates are too narrow, cutting off circulation. They can also occur if skates are too long, causing you to claw your toes to grip. Ensure your heel is locked back and your toes are relaxed, not curled.