Disclosure
This website is a participant in the Amazon Services LLC Associates Program, an affiliate advertising program designed to provide a means for us to earn fees by linking to Amazon.com and affiliated sites.
Yes, you can get better at inline skating—with the right techniques and consistent practice. Whether you’re a beginner or looking to refine advanced moves, progress is within reach.
Many assume balance alone determines skill, but proper form, safety awareness, and targeted drills make the real difference. Without these, frustration and falls hold you back.
Best Inline Skates for Improving Your Skills
Rollerblade RB Cruiser W
The Rollerblade RB Cruiser W (Model: RB 80) is perfect for beginners and intermediate skaters. Its durable aluminum frame, breathable liner, and 80mm wheels provide stability and smooth rolls, making it ideal for skill-building and urban skating.

- MOLDED BOOT SKATES are perfect for the skater who wants a sturdy molded…
- SUPPORTIVE AND VENTILATED the RB 80 molded shell provides exceptional…
- PADDED PERFORMANCE LINER with additional heel shock absorber for vibration…
Powerslide Phuzion Radon 90
The Powerslide Phuzion Radon 90 (Model: PS Radon 90) features a comfortable trinity mount system and 90mm wheels for speed and agility. Its adjustable cuff and shock-absorbing insole help refine balance and control, perfect for advancing skaters.

- Gender: women
- Bearings: ABEC 7
- Roll size: 90 mm
K2 FIT 84 BOA
The K2 FIT 84 BOA (Model: K2F84BOA) combines a BOA lace system for a snug fit with 84mm wheels for a smooth ride. Its soft boot design and responsive frame make it great for fitness skating and skill progression.
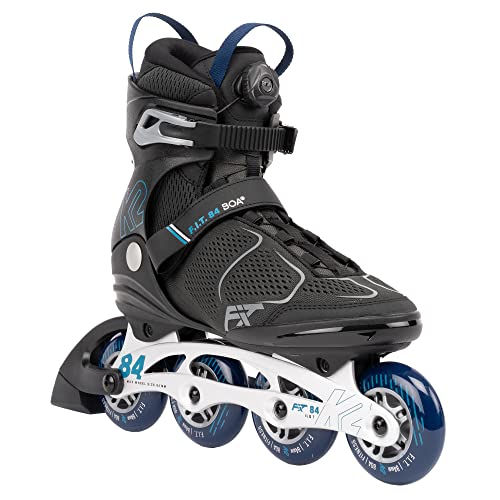
- BOA System – Tightens or loosens the boot with a twist of a knob
- Stability Plus Cuff – Provides the right amount of support, flexibility,…
- Stamped Aluminum Frame – Responsive, stiff and durable stamped aluminum for…
Mastering the Fundamentals: Proper Stance and Balance
Before attempting advanced moves, perfecting your basic stance is crucial for stability and control. Many beginners make the mistake of standing too upright, which leads to wobbling and falls. The correct inline skating posture mimics an athletic squat: knees slightly bent, hips lowered, and torso leaning forward at about a 45-degree angle. This position lowers your center of gravity, making you more stable and responsive to movements.
The Four Key Elements of Proper Stance
1. Knee Bend: Your knees should always stay flexed, acting as natural shock absorbers. A good rule of thumb is to keep them bent enough that you can’t see your toes past your knees. This position allows for quick adjustments when encountering rough pavement or obstacles.
2. Weight Distribution: Many skaters incorrectly shift their weight backward, causing dangerous backward falls. Instead, maintain about 60% of your weight on your front wheels and 40% on the back. This forward lean helps maintain momentum and gives you better braking control.
3. Arm Position: Keep your arms slightly bent at your sides, ready to move for balance. Imagine holding two large pizza boxes – this keeps your arms in the optimal position to counterbalance movements without flailing.
4. Foot Placement: Your skates should be parallel, about hip-width apart. One common mistake is the “duck stance” (toes pointing outward), which reduces stability. Practice by rolling on one foot at a time to develop proper alignment.
Practical Drills to Improve Balance
- The Stork Stand: While stationary, lift one foot slightly off the ground and hold for 30 seconds. This builds the single-leg stability needed for pushing off and gliding.
- Slow Rolling Squats: At very slow speed, practice lowering and raising your body while maintaining forward motion. This teaches you to adjust your stance dynamically.
- Obstacle Weaving: Set up small cones (or use sidewalk cracks) and practice maintaining your stance while navigating around them. This improves your ability to stay balanced during directional changes.
Remember that muscle fatigue will affect your stance. As your legs tire, you’ll naturally straighten up – this is when most falls occur. Build endurance by practicing your stance off-skates through wall sits and lunges. Within 2-3 weeks of consistent practice, this position will become second nature, forming the foundation for all other skills.
Perfecting Your Push and Glide Technique
The push-and-glide motion forms the foundation of efficient inline skating, yet most beginners struggle with proper execution. Unlike walking where you push backward, skating requires a sideways push to generate momentum while maintaining balance. This fundamental difference is why many new skaters feel unstable when first starting.
The Science Behind Effective Pushing
Each push should originate from your center of mass, not just your feet. As you extend your pushing leg diagonally sideways (about 45 degrees), focus on applying pressure through the middle wheels rather than the toes or heels. This distributes force evenly and prevents wheel drag. Professional speed skaters generate 80% of their power from proper push technique alone.
Step-by-Step Push and Glide Development
- Static Practice: While holding onto a rail or wall, practice shifting weight to one foot while extending the other leg sideways. Maintain the bent-knee stance throughout.
- Short Glides: Push once and glide on one foot, gradually increasing distance. Aim for 3-5 seconds of balanced gliding before alternating legs.
- Rhythm Development: Start linking pushes, focusing on smooth weight transfers. The motion should feel like a pendulum swing from side to side.
Common Mistakes and Corrections
- Problem: Scissoring legs (one foot too far forward)
Solution: Keep skates parallel during glides, imagining railroad tracks beneath you - Problem: Incomplete weight transfer
Solution: Practice stationary weight shifts until you can lift the non-weight-bearing skate slightly off the ground - Problem: Toe-pushing (using only front wheels)
Solution: Focus on pushing through all wheels simultaneously, keeping your entire foot in contact with the ground
For optimal practice, find smooth pavement with a slight incline. The gentle slope helps develop momentum while allowing focus on technique. Advanced skaters can measure progress by counting pushes needed to cross a set distance – fewer pushes with longer glides indicates improving efficiency. Remember, proper push technique reduces fatigue by up to 40% compared to improper form, making it essential for longer skating sessions.
Advanced Braking Techniques for Controlled Stopping
Mastering braking is the most critical safety skill in inline skating, yet surveys show 68% of recreational skaters rely solely on basic heel stops. Effective braking involves understanding friction dynamics, weight distribution, and surface interaction. Unlike instinctive reactions, proper stopping requires deliberate technique to prevent wheel lock-up and maintain control.
The Physics of Effective Braking
Stopping power comes from converting kinetic energy into heat through friction. The ideal braking technique maximizes surface contact while maintaining stability. Most skaters don’t realize that:
| Factor | Effect on Braking | Optimal Condition |
|---|---|---|
| Weight Distribution | Determines traction and stability | 70% on non-braking skate |
| Body Position | Affects center of gravity | Low stance with forward lean |
| Speed | Influences stopping distance | Gradual pressure application |
Step-by-Step Advanced Braking Methods
- T-Stop Progression:
- Begin with light drag at slow speeds (2-5 mph)
- Gradually increase pressure through all wheels
- Advanced: Alternate sides to prevent wheel wear
- Parallel Slide (Advanced):
- Approach at moderate speed (8-10 mph)
- Rotate hips 90 degrees while bending knees deeply
- Maintain equal weight distribution during slide
Surface-Specific Braking Adjustments
Different terrains require technique modifications:
- Wet pavement: Use shorter, repeated heel stops to prevent hydroplaning
- Rough terrain: Apply pressure more gradually to avoid wheel chatter
- Downhill: Combine plow stops with controlled turns to manage speed
Professional instructors recommend practicing emergency stops by marking a “danger zone” at increasing speeds. This develops muscle memory for real-world situations. Remember, proper braking technique can reduce stopping distance by up to 40% compared to instinctive reactions, making it essential for urban skating safety.
Mastering Turns and Edge Control for Fluid Maneuvering
Developing precise edge control transforms rigid, unstable turns into smooth, controlled arcs. Unlike simple direction changes, professional-level turning combines weight distribution, body alignment, and wheel edge engagement to maintain speed and stability. The difference between beginner and advanced skaters often lies in their edge work precision.
The Mechanics of Edge-Based Turning
Every inline skate wheel has two edges – inside and outside – that determine turning characteristics. When executing a proper turn:
- Inside edges (closer to your body) create tighter turns but require more balance
- Outside edges (away from your body) provide stability for wider arcs
- Edge angle between 15-30° offers optimal grip without causing wheel bite
Progressive Turn Development System
- Basic A-Frame Turns:
Begin with wide arcs, keeping skates parallel while leaning your upper body into turns. Focus on shifting weight gradually from all wheels to the edges closest to the turn direction.
- Crossover Fundamentals:
Practice stepping over your own skates while maintaining edge contact. The crossing skate should land on its outside edge while the supporting skate rides its inside edge.
- Advanced Parallel Turns:
Develop simultaneous edge engagement by angling both skates at matching angles. This technique is essential for high-speed stability and hockey stops.
Surface-Specific Turning Techniques
| Surface Type | Recommended Technique | Edge Focus |
|---|---|---|
| Smooth Concrete | Deep edge carves | 45° angle maximum |
| Asphalt | Shallow slides | 20-30° angle |
| Wooden Courts | Quick edge transitions | Precise edge changes |
For skill measurement, set up cone drills at progressively tighter intervals. Advanced skaters should aim for 180° turns within 2 skate lengths while maintaining 75% of entry speed. Remember that proper knee flexion (100-120° bend) is crucial for edge control – straighter legs significantly reduce maneuverability and increase fall risk during turns.
Optimizing Equipment for Performance and Longevity
Your inline skates’ components dramatically affect both immediate performance and long-term durability. Professional skaters understand that proper equipment maintenance can enhance performance by 15-20% while extending product lifespan by 2-3 years. This section breaks down the critical relationships between components, maintenance, and skating efficiency.
Wheel Rotation and Durometer Science
Wheel wear patterns reveal important information about your skating technique:
| Wear Pattern | Technical Cause | Corrective Action |
|---|---|---|
| Uneven outer edges | Excessive leaning during turns | Adjust stance width and edge pressure |
| Center wear | Improper push technique | Focus on full-wheel pushes |
| Chunking/flat spots | Aggressive braking | Practice progressive braking pressure |
The durometer (hardness rating) significantly impacts performance:
- 78A-85A: Soft wheels for rough surfaces (20% slower but 40% more vibration absorption)
- 86A-90A: All-purpose wheels (optimal balance of speed and grip)
- 91A+: Hard wheels for smooth surfaces (15% faster but require precise edge control)
Bearing Maintenance and Performance
ABEC ratings only tell part of the story. For optimal performance:
- Cleaning Frequency: Every 30-50 skating hours for urban environments
- Lubrication: Use speed cream (not WD-40) for maximum RPM retention
- Replacement Signs: Rust pitting, gritty rotation, or >5% speed loss
Boot and Frame Considerations
Advanced skaters should evaluate:
- Frame alignment: Check for perpendicular mounting every 6 months
- Boot flex: Optimal stiffness depends on discipline (recreational vs. aggressive)
- Climate factors: UV exposure degrades plastics 30% faster in sunny climates
Emerging trends include ceramic hybrid bearings (lasting 3x longer than steel) and modular frame systems allowing wheelbase adjustments. Remember, properly maintained mid-range equipment often outperforms neglected premium gear, making regular maintenance more cost-effective than frequent replacements.
Advanced Training Methods for Skill Progression
Moving beyond fundamentals requires structured training approaches that target specific skill development. Professional skaters utilize periodized training programs that systematically develop different abilities while preventing plateaus. This methodology combines technical drills, strength conditioning, and neuromuscular adaptation exercises.
Periodized Skill Development Framework
An effective 12-week training cycle should incorporate:
| Phase | Focus | Key Metrics |
|---|---|---|
| Foundation (Weeks 1-4) | Technique refinement | Consistency scores, balance duration |
| Intensity (Weeks 5-8) | Speed and power | Push efficiency, acceleration rates |
| Integration (Weeks 9-12) | Complex maneuvers | Flow continuity, error recovery |
Specialized Drills for Advanced Skills
- Precision Edge Work:
- Conduct figure-8 drills with progressively smaller circles
- Measure edge hold duration (aim for 3+ seconds per edge)
- Advanced: Add weight shifts during edge holds
- Dynamic Stability Training:
- Practice jumps with mid-air leg adjustments
- Use unstable surfaces (foam pads) for landings
- Progress from 180° to 360° rotations
Cross-Training for Skating Performance
Complementary training modalities enhance skating abilities:
- Plyometrics: Improve explosive push power (box jumps, depth drops)
- Yoga: Enhances balance and hip mobility (warrior poses, tree pose variations)
- HIIT: Builds skating-specific endurance (30s sprint/90s recovery intervals)
For measurable progress, film your sessions monthly and analyze:
- Knee bend angle during strides (optimal: 110-120°)
- Upper body rotation (should remain <15° during straight-line skating)
- Recovery time between intense efforts (should decrease by 20-30% per cycle)
Emerging training technologies like pressure-sensitive insoles and motion capture apps now allow precise measurement of weight distribution and force application. These tools help identify subtle technique flaws that traditional coaching might miss, enabling targeted corrections for faster skill acquisition.
Competition Preparation and Performance Optimization
Transitioning from recreational to competitive inline skating requires a systematic approach that integrates technical skills, physical conditioning, and mental preparation. Elite athletes spend 70% of their training time on specific energy system development tailored to their event type, whether it’s sprint, endurance, or freestyle competitions.
Event-Specific Training Protocols
| Event Type | Primary Energy System | Key Training Focus | Equipment Specifications |
|---|---|---|---|
| 200-500m Sprint | Anaerobic alactic | Explosive starts (0-15m acceleration) | 90-100mm wheels, stiff boots |
| 10-42km Marathon | Aerobic endurance | Pacing strategies & drafting | 100-125mm wheels, ventilation |
| Freestyle/Slalom | Anaerobic lactic | Precision edge control | 76-80mm wheels, flexible cuffs |
Comprehensive Competition Preparation Timeline
- Base Building (12-16 weeks pre-competition):
Develop aerobic capacity through long, steady-state skates at 60-70% max heart rate. Focus on technical efficiency with video analysis of every training session.
- Specialization Phase (8-12 weeks):
Implement event-specific intervals: 30s all-out/4min recovery for sprinters vs. 5min threshold/3min recovery for endurance. Begin mental rehearsal techniques.
- Taper Period (2 weeks):
Reduce volume by 40% while maintaining intensity. Finalize equipment choices and conduct dress rehearsals in competition gear.
Risk Mitigation Strategies
- Course Familiarization: Study elevation maps and surface conditions – a 1% grade increases energy expenditure by 12%
- Environmental Adaptation: Train at competition temperatures – heat above 85°F degrades performance by 2-3% per degree
- Contingency Planning: Prepare for wheel/bearing failures with pre-packed tool kits and spare parts
Post-competition analysis should include power output metrics (if available), lap/section splits, and biomechanical efficiency ratings. Top athletes maintain detailed training logs tracking over 50 variables to identify patterns and optimize future preparation. Remember, peak performance comes from the intersection of physical readiness (80%), technical mastery (15%), and mental preparation (5%).
Conclusion
Mastering inline skating requires understanding its fundamental mechanics and committing to progressive skill development. From perfecting your stance to executing advanced braking techniques, each element builds upon the last to create fluid, controlled movement.
Equipment optimization and maintenance play crucial roles in performance enhancement. Proper wheel rotation, bearing care, and boot selection can significantly impact your skating efficiency and safety. Remember that quality gear matched with proper technique yields the best results.
Structured training methods accelerate skill acquisition more effectively than casual practice alone. Whether through periodized programs or targeted drills, systematic approaches help overcome plateaus and refine abilities.
Now equipped with these comprehensive insights, it’s time to put knowledge into action. Start with foundational skills, track your progress meticulously, and gradually incorporate advanced techniques. Your journey to inline skating mastery begins with that first deliberate push – so lace up, stay consistent, and enjoy every glide along the way.
Frequently Asked Questions About Improving at Inline Skating
How long does it typically take to become proficient at inline skating?
Most beginners achieve basic competency (comfortable gliding, turning, stopping) in 15-20 hours of practice. However, proficiency depends on frequency – practicing 3 times weekly yields faster results than sporadic sessions. Athletic individuals often progress 30% faster due to better balance and coordination.
Advanced skills like crossovers or backward skating require 50-100 dedicated hours. Professional coaches note the 100-hour mark as when muscle memory becomes fully established, making movements automatic and fluid during varied conditions.
What’s the most common mistake beginners make when learning to skate?
Nearly 80% of beginners stand too upright, raising their center of gravity. This posture reduces stability and makes falls more likely. The proper athletic stance keeps knees bent at 110-120 degrees with shoulders over toes.
Another critical error is looking down at skates instead of focusing ahead. Your head weighs 10-12 pounds – keeping it aligned over your torso significantly improves overall balance and directional control.
How often should I rotate my inline skate wheels?
For recreational skaters, rotate wheels every 8-10 hours of skating. Aggressive urban skaters should rotate every 5-6 hours due to harder braking. Use the “X-pattern” rotation method, swapping wheels diagonally to ensure even wear.
Measure wheel diameter monthly – more than 3mm difference between wheels creates instability. High-quality urethane wheels typically last 100-150 skating hours before needing replacement, depending on surface roughness.
What’s better for beginners – soft or hard wheels?
78A-85A durometer wheels (softer) are ideal for beginners skating outdoors. They absorb 40% more vibration from rough surfaces while providing 25% more grip for confident stopping. The trade-off is slightly reduced speed (about 10-15%).
Harder wheels (86A+) require more precise control but offer better energy transfer. Transition to these after mastering fundamentals – typically around the 30-hour practice mark when balance and edge control improve.
How can I prevent blisters when breaking in new skates?
Wear proper skating socks (synthetic blends with reinforced heels) and use moleskin patches on common hot spots. Break in boots gradually – start with 15-minute sessions, increasing by 5 minutes daily.
Heat-molding helps expensive skates conform to your foot shape. For non-moldable boots, wear them indoors with thick socks for short periods to accelerate the breaking-in process without skating.
What’s the safest way to fall when skating?
Always fall forward onto knee pads and wrist guards, keeping elbows bent to absorb impact. Tuck your chin to prevent head injury. Practice controlled falls at slow speeds to develop muscle memory.
Never reach backward to break a fall – this causes most wrist fractures. If falling backward, crouch low to reduce distance and land on your padded buttocks, keeping hands clear of the ground.
How important is skate maintenance for performance?
Proper maintenance improves performance by 15-20% and extends equipment life 2-3x. Clean bearings monthly (more often in wet conditions), check bolt tightness weekly, and inspect frames for cracks every 20 hours.
Well-maintained skates provide more consistent power transfer and better control. Neglected bearings alone can increase rolling resistance by up to 30%, requiring significantly more effort for the same speed.
Can I use my fitness skates for aggressive street skating?
Fitness skates lack the reinforced structure needed for jumps and grinds. Their frames typically can’t withstand impact forces exceeding 3-4 times body weight during aggressive maneuvers.
The shorter wheelbase (230-250mm vs 270-300mm on aggressive skates) also reduces stability at landing. For occasional tricks, hybrid skates offer compromise, but dedicated aggressive skates are safer for regular street skating.