Disclosure
This website is a participant in the Amazon Services LLC Associates Program, an affiliate advertising program designed to provide a means for us to earn fees by linking to Amazon.com and affiliated sites.
You can safely remove figure skate blades using the right tools and technique. This prevents costly damage to your expensive boots. Our complete guide shows you the proven method.
Improper removal risks cracking the sole or stripping screw threads. This compromises support and blade alignment. Mastering this skill saves money and extends your skate’s life.
The Hidden Dangers of DIY Blade Removal
Many skaters attempt blade removal with household tools. This is a major mistake. Using the wrong screwdriver can strip screw heads instantly.
A stripped screw becomes nearly impossible to remove. This often leads to forcing the blade, which cracks the boot’s sole. A cracked sole loses structural integrity and is a costly repair.
Even if successful, improper technique can misalign mounting plates. This affects your skate’s balance and performance. It’s a preventable problem with the right approach.
The Essential Tool for a Safe Fix
The solution starts with using the correct tool. A proper skate screwdriver is non-negotiable. Its tip perfectly fits the screw head to prevent stripping.
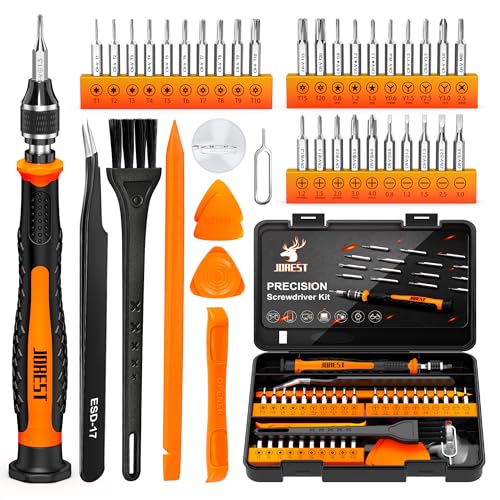
We recommend the JOREST Precision Screwdriver Set. It’s designed specifically for ice skate maintenance.
- Includes multiple hex and Phillips bits for all major skate brands.
- Magnetic tip holds screws securely, preventing loss.
- Ergonomic handle provides maximum torque with minimal effort.
- 【Precision screwdriver set】– 40Pcs screwdriver set has 30 CRV…
- 【Slip-resistant rotatable handle】– All our screwdriver bits are made…
- 【Portable gadgets】– The triangular spudger is more suitable for…
Check current price on Amazon →
When a Simple Tool Isn’t Enough
If screws are already corroded or stripped, a tool alone may not work. This indicates a deeper maintenance issue. Persistent problems often mean the blades or boots need professional assessment or replacement.
For those seeking new skates with reliably mounted blades, consider premium figure skates with stainless steel blades. Our buying guide explains why blade quality matters from the start.
If you’re upgrading your entire setup, read our in-depth Jackson Ultima Classic series review. For versatile options, see our guide on the best ice skates for indoor and outdoor use.
Essential Tools for Removing Figure Skate Blades
Gathering the right tools is the first critical step. Using incorrect equipment is the leading cause of boot damage. This preparation ensures a smooth, safe blade removal process.
You need more than just a screwdriver. A proper workspace and supporting tools prevent accidents. Investing in a few key items protects your expensive skating investment.
The Non-Negotiable Tool Kit
Your toolkit must match the specific hardware on your skates. Most modern figure skates use hex head (Allen) screws, while some older models use Phillips.
- Precision Skate Screwdriver/Hex Key Set: Must fit perfectly to avoid stripping. Magnetic tips are highly recommended.
- Penetrating Oil (e.g., WD-40): Crucial for loosening corroded or frozen screws. Apply 15-20 minutes before starting.
- Soft-Jaw Bench Vise or C-Clamp: Secures the boot without crushing or scratching the leather or synthetic material.
- Clean Microfiber Cloth & Brush: For cleaning exposed screw threads and sole after removal.
Setting Up Your Workspace Correctly
A proper workspace is as important as the tools. A cluttered or unstable area leads to mistakes and damaged equipment.
First, find a sturdy table and secure your vise to it. Place a soft towel under the boot’s heel and toe to prevent scratches. Ensure you have strong, direct lighting to see the screw heads clearly.
Keep all tools within easy reach. Organize screws in a small container or stick them to a piece of tape in order. This prevents loss and confusion during reassembly.
Identifying Your Skate’s Hardware Type
Before you touch a screw, identify what you’re dealing with. Look directly at the screw heads on the sole of your boot.
Most Jackson, Riedell, and Edea skates use hex screws. Some recreational brands use Phillips. Count the number of screws; it’s usually 4-6 per blade.
| Screw Type | Common Brands | Tool Needed |
|---|---|---|
| Hex (Allen) | Jackson, Riedell, Edea, SP-Teri | Precision Hex Key (e.g., 4mm or 5/32″) |
| Phillips (#2) | Some recreational & adjustable skates | #2 Phillips Screwdriver with Magnetic Tip |
If screws are rusted or have paint over them, gently clean the heads with your brush before attempting to fit the tool.
Step-by-Step Guide to Removing Blades Safely
Follow this precise sequence to detach your blades without harm. Rushing or skipping steps risks permanent boot damage. Patience and methodical action guarantee success.
This process assumes you have the correct tools and a prepared workspace. Refer to the previous section if you haven’t gathered your kit. Let’s begin the safe removal procedure.
Preparation and Initial Loosening
Start by applying penetrating oil to each screw head and the threads on the sole’s edge. Let it soak for at least 15 minutes to break down rust and threadlocker.
Secure the boot in your soft-jaw vise. Position it so the sole is facing up and perfectly stable. You should not have to hold the boot with your hands.
- Insert the tool perfectly: Place your hex key or screwdriver firmly into the screw head. Apply downward pressure to ensure it doesn’t slip.
- Break the initial seal: Turn the tool counter-clockwise (lefty-loosey) with a firm, steady motion. You may feel a “pop” if threadlocker was used.
- Loosen each screw slightly: Give each screw on the blade just 1-2 turns to break them all free before fully removing any single one.
Complete Screw Removal and Blade Detachment
Once all screws are loosened, you can proceed to full removal. Work in a crisscross pattern, similar to changing a car tire.
This prevents the blade from binding or twisting as the last screws hold it. It maintains even pressure on the boot sole throughout the process.
- Remove screws diagonally: Fully unscrew the front-left screw, then the rear-right screw. Place them safely on your cloth or in a container.
- Continue the pattern: Next, remove the front-right screw, followed by the rear-left. For six-screw mounts, continue the alternating pattern.
- Lift the blade off gently: Once all screws are out, carefully lift the blade straight up off the mounting plates. Do not pry or twist it off.
Post-Removal Inspection and Care
Immediately after blade removal, inspect both the boot sole and the blade’s mounting plates. Look for any signs of stress, cracking, or stripped threads.
Use your brush and cloth to clean any debris, old glue, or rust from the screw holes and plates. This ensures a clean surface for future mounting.
If you notice significant wear or damage, consult a professional skate technician. For insights on skate construction, read our Riedell Soar ice skates review to understand quality boot features.
Common Mistakes and How to Avoid Them
Even with the right tools, simple errors can ruin your skates. Knowing these pitfalls beforehand is your best defense. This section outlines critical blunders and their solutions.
These mistakes often stem from impatience or using improper substitutes. Taking your time and following protocol saves you from expensive repairs or replacement costs.
Using Improper Tools and Excessive Force
This is the number one cause of stripped screws. A standard hex key or screwdriver that is slightly worn or the wrong size will cam out.
- Mistake: Using a worn Phillips head or a metric hex key on an imperial screw (or vice-versa).
- Result: The tool rounds out the screw head, making it impossible to grip. Removal then requires destructive drilling.
- Solution: Always use pristine, correctly-sized tools. If a screw doesn’t turn easily, stop. Apply more penetrating oil and wait.
Never use pliers on a stripped screw unless it’s a last resort. This typically damages the boot sole. For quality tools and hardware, consider skates known for good construction, like those in our Lake Placid Cascade review.
Inadequate Boot Support During Removal
Holding the boot in your lap or hand creates instability. This leads to the tool slipping or applying torque to the boot material itself.
Twisting forces can delaminate the sole’s layers or crack the heel. Always use a vise or clamp to immobilize the boot completely.
- Secure the boot vertically by the heel in a soft-jaw vise.
- Ensure the sole plate is horizontal and easily accessible.
- Your hands should only operate the tool, not stabilize the skate.
Neglecting Screw and Thread Maintenance
Failing to clean and maintain hardware guarantees future problems. Corroded screws are exponentially harder to remove next time.
After removal, clean every screw with a brush and a drop of light oil. Inspect the threads in the boot for debris. Before remounting, consider applying a small amount of blue (removable) threadlocker to prevent loosening from vibration.
| Problem | Immediate Action | Long-Term Prevention |
|---|---|---|
| Rusted Screw | Soak in penetrating oil; use an impact driver gently. | Store skates in a dry environment; wipe blades dry after use. |
| Stripped Thread in Boot | Do not force. Consult a tech for a helicoil insert. | Always start screws by hand to ensure straight threading. |
| Lost Screw | Replace with an exact match in length, diameter, and thread pitch. | Use a magnetic tray or sticky tape to organize screws during work. |
When to Seek Professional Skate Sharpening Services
While blade removal is manageable, certain scenarios demand expert intervention. Recognizing these situations protects your equipment. A professional skate technician has specialized tools and experience.
Attempting a complex repair yourself can turn a minor issue into a major expense. Knowing when to call a pro is a sign of a smart skater.
Signs You Need a Skate Technician
Some problems are beyond the scope of a home toolkit. Persistent issues after following correct procedures are a clear signal.
- Severely Stripped Screws: If the screw head is completely rounded and your tool cannot grip, a pro can use an extractor bit or drill it out carefully.
- Frozen or Corroded Mounting Plates: When the blade seems chemically welded to the sole due to rust, forcing it can rip out the plate inserts.
- Cracked or Lifted Sole: Any visible damage to the boot’s foundation requires professional assessment and likely a full sole repair.
- Blade Re-Mounting & Alignment: Precise blade alignment is critical for performance. Professionals use jigs to ensure perfect centering and pitch.
What to Expect from a Professional Service
A good skate shop offers more than just brute force. They provide a comprehensive service that maintains your skate’s integrity.
They will safely remove the blades, even from problematic mounts. Next, they will clean all threads and inspect the boot for hidden damage. Finally, they can sharpen the blades and remount them with perfect alignment.
This holistic service is invaluable. For skaters considering new equipment to avoid old problems, our guide to the best ice skates for women highlights reliable, well-constructed models.
Finding a Qualified Skate Pro
Not all sporting goods stores have true figure skate experts. Seek out specialists who work regularly with figure skaters and hockey players.
| Service Provider | Pros | Cons |
|---|---|---|
| Dedicated Skate Shop | Specialized knowledge, proper tools, alignment jigs. | May be less convenient/locally available. |
| Pro Shop at Ice Rink | Convenient, understands skater needs. | Quality can vary; may have long wait times. |
| General Sporting Goods Store | Widely accessible. | Often lack figure-specific expertise; risk of improper handling. |
Ask for recommendations from coaches or fellow skaters. A reputable technician will gladly explain their process and show you their workshop.
Maintaining Your Skates After Blade Removal
Proper post-removal care extends the life of your skates and simplifies future work. This maintenance prevents rust, thread damage, and boot degradation. A little effort now saves significant trouble later.
This process involves caring for both the detached blades and the boot itself. Each component requires specific attention to stay in top condition.
Caring for the Detached Blades
Blades are vulnerable to nicks and rust when off the boot. Immediate and proper storage is crucial to preserve their sharp edges and steel.
- Dry and Oil Immediately: Wipe the entire blade, especially the mounting plates and screws, completely dry. Apply a very light coat of machine oil to all metal surfaces to prevent rust.
- Protect the Edges: Slide blade guards onto the steel. For long-term storage, use terrycloth soakers or blade covers that allow moisture to wick away.
- Store Safely: Place blades in a dry location, away from humidity. Do not let them knock against other metal objects which can dull the edges.
Preparing the Boot for Storage or Remounting
The boot sole and screw holes need protection from moisture and debris. Neglect here can lead to rotten thread inserts or a warped sole.
- Clean the Sole & Threads: Use a dry brush to remove all dirt and old glue from the mounting area. A cotton swab can clean inside the screw holes.
- Insert Screw Protectors: Place the original screws back into the holes and turn them in by hand for 1-2 threads. This keeps threads clear and prevents hole deformation.
- Condition the Boot: If you have leather boots, apply a appropriate leather conditioner to the exterior to prevent drying and cracking during storage.
Long-Term Storage Best Practices
If blades will be off for an extended period, take extra precautions. The environment is your biggest enemy.
Store boots and blades in a cool, dry place away from direct sunlight or heat sources. Avoid damp basements or hot attics. Use a breathable bag, not plastic, to prevent mildew.
Periodically check stored items for any signs of rust or mold. For skaters who use their gear frequently, choosing durable models like those in our Jackson Ultima Softskate 380 review can reduce maintenance frequency.
Advanced Tips for Frequent Blade Swappers
Some skaters regularly switch blades for different disciplines or travel. This demands a refined, efficient process. Mastering these advanced techniques minimizes wear and tear.
Frequent removal increases the risk of thread fatigue and sole stress. Implementing a professional-grade routine is essential for longevity.
Implementing a Thread Management System
Repeated screwing and unscrewing wears down the aluminum or brass inserts in the boot sole. A systematic approach preserves these critical threads.
- Use Threadlocker Strategically: Apply a tiny drop of blue (removable) Loctite 243 to screw threads every 2-3 remounts. This fills micro-gaps and prevents loosening, but allows future removal.
- Chase the Threads: Periodically, use the correct screw as a “tap.” Gently screw it in and out of each hole to clean and re-form the threads, removing any debris or burrs.
- Consider Helicoil Inserts: For boots with stripped or worn threads, a technician can install stainless steel helicoil inserts. This creates a new, more durable thread that outlasts the original.
Creating a Dedicated Blade Swap Kit
Organize all blade-swapping essentials in one portable case. This saves time and ensures you never use the wrong tool.
Your kit should include your precision screwdriver set, a small bottle of penetrating oil, blue threadlocker, a microfiber cloth, and a magnetic parts tray. Also include a torque-limiting driver if you have one, set to the manufacturer’s specification (usually 20-25 in/lbs).
Label everything clearly. This organized approach is perfect for skaters who travel or train at multiple rinks. For travel-friendly skate options, see our Lake Placid Nitro 8.8 review on adjustable models.
Documenting Blade Placement and Alignment
Consistent blade placement is critical for muscle memory and performance. Even slight variations can feel drastically different.
- Mark Your Standard Position: Once you have a perfect blade alignment, use a fine permanent marker to make tiny reference dots on the boot sole and blade plate.
- Photograph the Setup: Take clear, well-lit photos of the mounted blade from the bottom, side, and heel. Store these in a digital folder for reference.
- Keep a Log: Note the date of each swap, which blades were used, and any shims or adjustments made. This log helps diagnose wear patterns over time.
This meticulous documentation ensures you can replicate your ideal setup perfectly every time, whether you’re switching to freestyle or dance blades.
Best Tools for Figure Skate Blade Removal – Detailed Comparison
Investing in the right specialized tools makes blade removal safe and simple. These three products are highly recommended by skate technicians and experienced skaters. Each serves a slightly different need and budget.
JOREST Precision Screwdriver Set – Best Overall Kit
This comprehensive set includes both hex and Phillips bits in the exact sizes for all major skate brands. The magnetic tip and ergonomic handle provide perfect control to prevent stripping. It’s the ideal all-in-one solution for any skater performing regular maintenance.
- 【Precision screwdriver set】– 40Pcs screwdriver set has 30 CRV…
- 【Slip-resistant rotatable handle】– All our screwdriver bits are made…
- 【Portable gadgets】– The triangular spudger is more suitable for…
Wera 05073675001 Kraftform Micro Screwdriver – Best Premium Precision
For unmatched quality, the Wera Kraftform series offers laser-tipped hex keys that grip screw heads exceptionally well. The anti-roll handle and superior steel construction ensure longevity. This is the best option for frequent blade swappers who demand flawless performance.
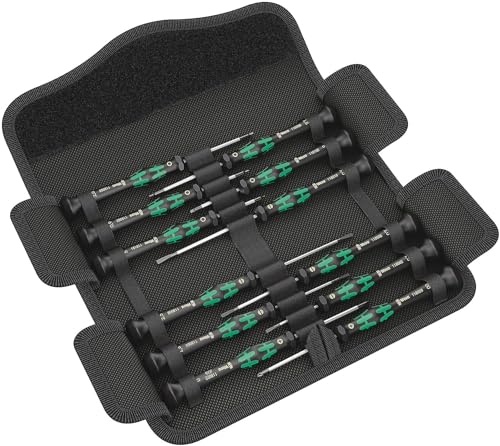
- Kraftform Micro set in a robust pouch
- Anti-roll feature and swivel cap for rapid twisting
- The Wera Black Point tip offers an exact fit and optimum corrosion…
Bondhus 10937 Balldriver L-Wrench Set – Best Value & Durability
Bondhus tools are famous for their golden finish and ball-end design, allowing access at angles. This set provides the critical sizes (4mm, 5/32″) for most figure skates at an affordable price. It’s ideal for beginners or as a reliable backup tool.
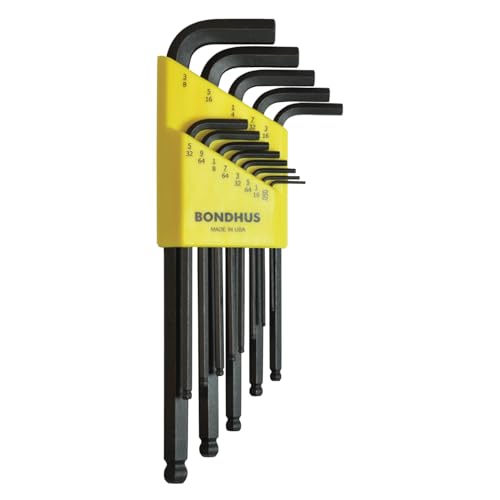
- High quality, professional grade
- The strongest tools available anywhere
- Angle entry up to 25o on sizes .050, 1/16, 5/64, 3/32, 7/64, 1/8, 9/64,…
Conclusion: Mastering Safe Figure Skate Blade Removal
You now have the complete guide to safely remove figure skate blades. Using the right tools and step-by-step process prevents costly boot damage. This skill protects your investment and ensures optimal performance.
The key takeaway is patience and preparation. Never force a screw or use improper tools. Following these expert methods guarantees success every time.
Gather your toolkit and approach your skates with confidence. Share this guide with fellow skaters to help them avoid common mistakes.
With this knowledge, you are in full control of your equipment’s maintenance and longevity. Happy skating!
Frequently Asked Questions about Removing Figure Skate Blades
What is the best screwdriver for removing figure skate blades?
The best tool is a precision skate screwdriver or hex key set designed specifically for skate maintenance. Look for magnetic tips and perfect fit for your screw type (usually 4mm or 5/32″ hex). Brands like SkateMate Pro or Wera Kraftform offer the control needed to prevent stripping the delicate screw heads.
Avoid standard household tools at all costs. The wrong size or worn tip is the leading cause of irreversible damage. Investing in the correct driver is cheaper than repairing a stripped screw or cracked boot sole.
How often should I remove my figure skate blades?
Only remove blades when absolutely necessary: for professional sharpening if required by your shop, blade replacement, or major boot repair. Frequent, unnecessary removal increases wear on the screw threads and boot sole. Most modern skate shops can sharpen blades while they are still mounted on the boot.
If you travel and need to ship blades for specialty sharpening, removal is necessary. Otherwise, minimize handling to preserve the integrity of the mounting system and your blade’s precise alignment.
What should I do if a blade screw is completely stripped?
Stop all removal attempts immediately. Do not use pliers, as this often damages the boot material. Your best course of action is to take the skate to a professional skate technician. They have specialized extractor bits that can remove the damaged screw without harming the threads in the sole.
Attempting to drill it out yourself is risky and can ruin the boot. A professional can often install a helicoil insert to repair the threads, making them stronger than the original.
Can I use WD-40 to loosen frozen skate screws?
Yes, WD-40 or a dedicated penetrating oil like PB Blaster is highly recommended for frozen or corroded screws. Apply it generously to the screw head and the seam where the screw meets the sole. Allow it to soak for at least 15-20 minutes, or even overnight for severe cases.
The oil wicks into the threads, breaking down rust and old threadlocker. This dramatically reduces the force needed to turn the screw, minimizing the risk of stripping the head or damaging the boot.
Is it safe to remove blades from brand new skates?
It is generally safe if done correctly, but often unnecessary. New skates come with blades perfectly aligned by the manufacturer. However, some high-level skaters immediately switch to their preferred blade model. If you must, use extreme care as factory-applied threadlocker can be strong.
Check your skate’s warranty first, as some manufacturers may void it if damage occurs during user removal. For your first time, consider having a professional perform the initial removal.
What is the proper torque for tightening blade screws?
Blade screws should be tightened firmly but not with excessive force. Most manufacturers recommend 20-25 inch-pounds of torque. Overtightening can strip the aluminum threads in the boot or warp the blade plate. The best practice is to tighten until snug, then give a final gentle quarter-turn.
Using a small drop of blue (removable) threadlocker on the screws is advised. This prevents them from vibrating loose during skating while still allowing for future removal with standard tools.
How do I know if I damaged my boot during blade removal?
Inspect the boot sole carefully after removal. Look for visible cracks in the leather, composite, or plastic around the screw holes. Check if the screw holes appear enlarged, elongated, or have shredded threads. Also, ensure the mounting plate area is completely flat and not delaminating.
If the blade felt like it was “stuck” and required prying to get off, you may have damaged the adhesive or the sole’s layers. Any sign of damage warrants assessment by a professional skate repair technician.
Can I mount any brand of blade onto my existing boots?
No, blade and boot compatibility is not universal. The blade’s mounting plate must match the hole pattern (drill pattern) and length of your boot sole. Using an incompatible blade can affect balance, pitch, and structural integrity. Always consult a blade mounting chart from the manufacturer or a qualified technician.
They will ensure the blade is the correct size and that the screw holes align perfectly. Forcing a mismatched blade can require drilling new holes, which permanently alters and potentially weakens your boot.
What if a screw won’t budge at all?
First, apply a high-quality penetrating oil like PB Blaster or Kroil. Let it soak for several hours or overnight. Use an impact driver (hand-held, not power) with the correct bit. The sharp, rotational impact can break the bond without stripping the head.
I’ve already stripped a screw head. What now?
Stop immediately. Do not attempt further removal with pliers, as this often damages the boot. Your best option is to take the skate to a professional technician. They can use a screw extractor kit or carefully drill out the screw without harming the sole threads.
How often should I remove my blades?
For the average skater, blades should only be removed for professional sharpening if your shop requires it, or for replacement. Unnecessary removal increases wear. Most modern shops can sharpen blades while mounted. If you must ship blades for sharpening, removal is necessary.
Can I reuse the same screws?
Yes, you can and should reuse the original screws if they are in good condition. Inspect each screw for worn or damaged threads. If any are compromised, you must replace them with an exact match in length, diameter, and thread pitch. Using the wrong screw can create new threads and weaken the hold.
Will removing blades void my skate warranty?
This depends entirely on the manufacturer. Some void the warranty if the boot is damaged by unauthorized removal. Others are more lenient. Always check your warranty documentation first. If in doubt, have the first removal done by an authorized dealer or professional.
Can I mount any blade on any boot?
No. Blades and boots have specific mounting patterns and plate lengths. The blade’s mounting plates must match the hole pattern on your boot sole. Consult a sizing chart from the blade manufacturer or a qualified technician. For compatible setups, explore our review of adjustable youth skates which often have standardized mounting.