Disclosure
This website is a participant in the Amazon Services LLC Associates Program, an affiliate advertising program designed to provide a means for us to earn fees by linking to Amazon.com and affiliated sites.
Stopping on inline skates isn’t just about braking—it’s about control and safety. Many beginners panic when they can’t halt smoothly, but mastering stops is simpler than you think.
You might believe speed is the enemy, but the real challenge is technique. Without proper methods, you risk falls or collisions. However, with the right skills, stopping becomes effortless.
Best Inline Skates for Stopping Safely
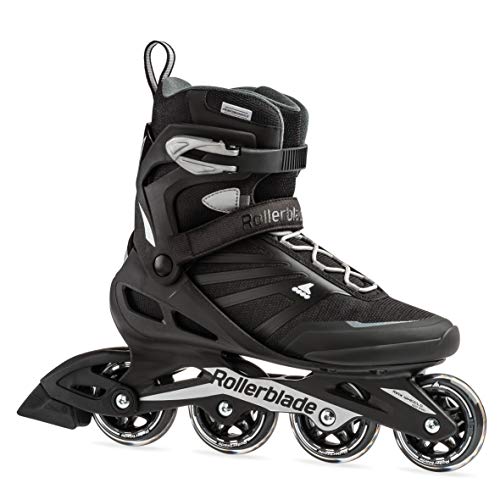
Rollerblade Zetrablade Men’s/Women’s Inline Skates
Ideal for beginners, the Rollerblade Zetrablade features a reliable heel brake and soft boot for comfort. Its aluminum frame ensures stability, while the 80mm wheels provide smooth control—perfect for mastering stops without sacrificing speed.
- IDEAL FOR CASUAL AND NOVICE SKATERS – Entry-level balanced skate for men…
- HIGH CUFF FOR ADDED SUPPORT – Durable shell makes learning to skate easier
- COMFORT PERFORMANCE LINER – Padded liner and secure closure system ensure…
Powerslide Phuzion Radon 90 Inline Skates
With a durable trinity mount frame and 90mm wheels, the Powerslide Phuzion Radon offers superior grip for advanced stopping techniques like T-stops and power slides. The adjustable cuff enhances ankle support, making it great for aggressive skaters.

- Gender: women
- Bearings: ABEC 7
- Roll size: 90 mm
K2 Kinetic 80 Pro Inline Skates
The K2 Kinetic 80 Pro combines a responsive heel brake with a lightweight, breathable design. Its rockered wheel setup improves maneuverability, helping skaters transition smoothly between stops and strides—ideal for urban skating and hill control.

- Speed Lacing – Secures skates with one pull making it easy to put on and…
- Stability Plus Cuff – Provides the right amount of support, flexibility,…
- F.B.I. frame – is a vibration-absorbing composite frame that is interlocked…
Mastering the Heel Brake: The Safest Way to Stop for Beginners
The heel brake is the most reliable stopping method for new inline skaters, designed specifically for controlled, predictable deceleration. Unlike advanced techniques that require precise weight distribution, the heel brake uses a rubber pad attached to your right skate’s rear frame. When you lift your toe and press the brake pad downward, friction against the ground slows you gradually. This method is foolproof for emergencies—even at moderate speeds—because it doesn’t demand complex balance adjustments.
Proper Heel Brake Form
To execute a heel brake correctly, follow these steps:
- Stagger your stance: Shift your weight to your left leg, bending the knee slightly for stability.
- Extend your right foot forward: Keep the skate straight, not angled, to prevent veering.
- Lift your toe gradually: Press the brake pad down firmly but smoothly—jamming it abruptly can cause a tumble.
Common mistakes include leaning too far back (which reduces control) or braking with bent ankles (diminishing pad contact). Practice in a flat, open area before tackling hills.
When to Use (and Avoid) the Heel Brake
The heel brake excels in straight-line stopping but has limitations. It’s ideal for:
- Wet pavement: The rubber pad grips better than wheel-based stops in rain.
- Crowded areas: Offers predictable deceleration near pedestrians.
However, avoid relying on it for sharp turns or high-speed downhill runs—the brake can overheat or lose effectiveness. Advanced skaters often transition to T-stops for these scenarios.
Maintenance Tips for Optimal Performance
A worn-out brake pad reduces stopping power. Check yours monthly:
- Replace if grooves disappear: Most pads last 3–6 months with regular use.
- Adjust alignment: Ensure the pad sits parallel to the ground when engaged.
Pro tip: Some skaters remove the heel brake prematurely, thinking it’s “for beginners.” Even experts keep it as a backup—Olympic speed skaters train with heel brakes for safety drills.
Perfecting the T-Stop: The Essential Intermediate Stopping Technique
The T-stop is the most versatile stopping method in inline skating, offering controlled deceleration without relying on a heel brake. Unlike the heel brake which only works in straight lines, the T-stop allows you to slow down while maintaining maneuverability – crucial for navigating urban environments or crowded trails.
The Biomechanics of a Proper T-Stop
Executing a flawless T-stop requires precise weight distribution and skate positioning:
- Weight distribution: 90% of your weight stays on your front (dominant) foot, with just enough pressure on the rear foot to create friction
- Foot positioning: Your rear skate forms a perfect “T” shape perpendicular to your front skate, with all four wheels making contact
- Body posture: Maintain a low center of gravity with bent knees and slightly forward lean to prevent backward falls
Common mistakes include dragging only two wheels (reduces stopping power) or putting too much weight on the rear foot (causes spin-outs). Practice first at walking speeds, listening for the consistent scraping sound of all wheels evenly contacting pavement.
Progressive Learning Method
Master the T-stop through these progressive drills:
- Stationary T-position: Practice the foot formation while holding onto a railing
- Slow drags: At minimal speed, lightly drag your rear wheels for 2-3 feet
- Pulse stops: Alternate between short drags and glides to build muscle memory
- Full stops: Gradually increase pressure until you can stop within 10 feet at moderate speeds
Advanced skaters modify the T-stop by angling their rear skate slightly forward (called a “L-stop”) for quicker stops, but this requires exceptional ankle strength to prevent wheel bite.
Surface Considerations
The T-stop’s effectiveness varies by terrain:
- Smooth concrete: Provides ideal consistent friction
- Asphalt: Wears wheels faster but offers good stopping power
- Wet surfaces: Requires 50% more stopping distance – modify pressure accordingly
Pro tip: Rotate your wheels frequently as T-stops cause asymmetrical wear. Many skaters designate specific wheels for stopping to preserve others for speed.
Advanced Stopping Techniques: Power Slides and Parallel Stops for Speed Control
When you’ve mastered basic stops and need to handle steep hills or emergency situations, power slides and parallel stops become essential tools in your skating arsenal. These advanced techniques rely on precise weight transfer and skate angling to maximize friction while maintaining control.
The Physics Behind Power Slides
Power slides work by converting forward momentum into rotational energy, then dissipating it through controlled sideways friction. The key physical principles involved are:
| Element | Role in Stopping | Optimal Conditions |
|---|---|---|
| Centripetal Force | Maintains circular slide path | 45-60 degree skate angle |
| Friction Coefficient | Determines stopping distance | 85A-90A wheel hardness |
| Weight Distribution | Controls slide initiation | 70% weight on lead foot |
Step-by-Step Power Slide Execution
- Approach preparation: Build moderate speed (10-15 mph) in a slight crouch with knees bent at 120 degrees
- Initiation: Shift weight to your dominant foot while rotating hips 45 degrees in your stopping direction
- Slide phase: Extend your non-dominant foot perpendicular to your direction of travel, maintaining firm edge control
- Completion: Gradually straighten your sliding foot to increase friction as you come to a complete stop
Professional speed skaters recommend practicing on smooth, slightly inclined surfaces before attempting flat-ground power slides. Common mistakes include:
- Leaning too far forward (causes toe-wheel catches)
- Insufficient hip rotation (leads to unstable slides)
- Over-rotating (results in spin-outs)
Parallel Stops for Technical Terrain
Parallel stops (or hockey stops) offer the quickest deceleration but require precise technique. The motion resembles an ice hockey stop, with both skates sliding perpendicular to your original path. Key differences from power slides include:
- Stance: Feet shoulder-width apart rather than staggered
- Edge work: Uses inside edges of both skates simultaneously
- Upper body: Requires counter-rotation of shoulders relative to hips
Pro tip: Build ankle strength through off-skate exercises like wobble board drills before attempting parallel stops regularly. Most skaters need 6-12 months of consistent practice to execute these stops reliably at high speeds.
Emergency Stopping Techniques and Safety Protocols
When standard stopping methods fail or you encounter unexpected obstacles, emergency stopping techniques can mean the difference between a close call and a serious accident. These high-intensity maneuvers require quick reflexes and proper body mechanics to execute safely.
Three-Stage Emergency Stop Protocol
Professional skating instructors teach a systematic approach to emergency stops:
- Initial deceleration: Immediately shift into a deep crouch (knees at 90 degrees) to lower your center of gravity while initiating a heel brake or T-stop
- Secondary control: If still moving too fast, transition to a power slide while scanning for safe runoff areas (like grass or upward slopes)
- Final arrest: As a last resort, perform a controlled fall using protective gear to minimize injury while stopping your momentum
Controlled Falling Techniques
When stopping isn’t possible, proper falling can prevent serious injury:
- Knee slide: Drop to your kneepads while keeping your hands in fists to prevent finger injuries
- Rolling fall: Tuck your chin and roll diagonally across your back to distribute impact
- Four-point contact: Simultaneously touch down both hands and knees while keeping your skates off the ground
Advanced skaters practice these falls monthly to maintain muscle memory. Common mistakes include sticking arms straight out (risking wrist fractures) or falling backward (which can cause head injuries).
Terrain-Specific Stopping Strategies
| Surface Type | Optimal Technique | Stopping Distance* |
|---|---|---|
| Wet pavement | Heel brake with staggered stance | 2.5x dry conditions |
| Steep declines | Carving turns with T-stop pulses | Gradual reduction |
| Crowded areas | Parallel stop with audible warning | 3-5 feet |
*For 150lb skater at 15mph. Always allow extra distance for safety margins.
Pro tip: Regularly test your stopping distance in controlled environments. Mark reference points with chalk every 5 feet to measure improvement. Most municipalities require skaters to maintain stopping capability within 15 feet at 10mph on level ground.
Equipment Optimization for Maximum Stopping Performance
Your inline skates’ components significantly impact stopping efficiency and safety. Understanding how each element affects braking performance allows for precise customization to match your skating style and environment.
Wheel Configuration and Stopping Dynamics
Wheel characteristics create distinct stopping profiles:
| Wheel Property | Impact on Stopping | Ideal Application |
|---|---|---|
| Hardness (78A-90A) | Softer wheels grip better but wear faster during slides | 78A-82A for street braking; 85A+ for slide stops |
| Diameter (76mm-110mm) | Larger wheels require more force to stop but maintain speed | 80mm-84mm optimal for urban stopping |
| Profile (Round vs Flat) | Rounded edges facilitate slides; flat profiles increase friction | Mixed setups for versatile stopping |
Frame and Bearing Considerations
Advanced skaters optimize these often-overlooked components:
- Frame length: Shorter frames (230mm-243mm) enable quicker stops but reduce stability at speed
- Bearing ABEC rating: Higher ABEC (7-9) maintains speed longer, requiring more stopping force
- Mounting system: Trinity mount frames offer better power transfer for aggressive stops
Pro tip: Create a dedicated “stopping wheel” setup by rotating your most worn wheels to the braking position, preserving newer wheels for propulsion.
Maintenance Schedule for Peak Performance
- Weekly: Check brake pad thickness (replace at 3mm remaining)
- Monthly: Inspect wheel conicity from T-stop wear patterns
- Quarterly: Test bearing spin resistance (should stop within 8-12 seconds)
- Annually: Evaluate frame integrity for stress fractures
Environmental factors dramatically affect maintenance needs. Urban skaters in rainy climates should:
- Clean bearings twice as often (saltwater exposure requires weekly maintenance)
- Replace brake pads 30% more frequently
- Use ceramic bearings in coastal areas to prevent corrosion
Emerging technologies like magnetic braking systems and smart wearables that analyze stopping patterns are revolutionizing safety, though currently at premium price points ($400+ for advanced setups).
Adapting Stopping Techniques for Different Skating Disciplines
Professional inline skaters modify stopping techniques based on their specific discipline, as each skating style presents unique speed profiles, surface conditions, and maneuverability requirements. Understanding these variations ensures optimal safety and performance.
Discipline-Specific Stopping Methodologies
The stopping approach varies dramatically across skating specialties:
| Discipline | Primary Stop | Technical Considerations |
|---|---|---|
| Speed Skating | Double Push Slide | Maintains aerodynamic position while shedding speed |
| Aggressive Street | Backside Powerslide | Allows obstacle avoidance during deceleration |
| Urban Fitness | Modified T-Stop | Preserves wheel longevity during frequent stops |
| Roller Hockey | Hockey Stop | Enables instant direction changes |
Specialized Equipment Configurations
Each discipline requires tailored equipment setups for optimal stopping:
- Speed skaters: Use harder wheels (88A-90A) with minimal tread for controlled slides
- Urban commuters: Benefit from mixed wheel setups (softer rear wheels for braking)
- Vert skaters: Prefer smaller diameter wheels (56mm-60mm) for rapid deceleration
- Slalom specialists: Utilize rockered frames for precision stopping during complex maneuvers
Transitioning Between Disciplines
When switching skating styles, skaters must adjust their stopping techniques progressively:
- Muscle memory retraining: Spend 2-3 sessions practicing stops at 50% normal speed
- Equipment adaptation: Gradually adjust wheel hardness in 4A increments
- Surface testing: Practice on controlled surfaces before attempting street applications
- Progressive loading: Increase stopping force by 10% per session to avoid overuse injuries
Professional coaches recommend maintaining a “stop journal” to track adaptation progress, noting variables like:
- Stopping distance at set speeds
- Wheel wear patterns
- Muscle fatigue levels
- Surface conditions
Emerging cross-discipline techniques like the “Magic Slide” combine elements from aggressive and speed skating, offering versatile stopping power but requiring 6-12 months of dedicated practice to master safely.
Mastering Stopping Proficiency: Long-Term Skill Development and Safety Integration
Developing true stopping mastery requires a systematic approach that integrates technical skills, equipment knowledge, and situational awareness. This final section provides a comprehensive framework for achieving stopping excellence at any skill level.
Progressive Skill Development Framework
Building reliable stopping ability follows these developmental phases:
| Phase | Duration | Key Milestones | Safety Benchmarks |
|---|---|---|---|
| Foundation | 1-3 months | Consistent heel brake stops at 10mph | 95% success rate on dry pavement |
| Intermediate | 4-6 months | Reliable T-stops with wheel preservation | Stop within 15 feet at 15mph |
| Advanced | 7-12 months | Power slides on command | Emergency stops within 10 feet |
| Expert | 1+ years | Discipline-specific specialty stops | Adapt stops to any surface condition |
Comprehensive Risk Assessment Protocol
Before attempting stops in new environments, conduct this five-point evaluation:
- Surface analysis: Check for cracks, debris, or moisture that affects traction
- Runoff assessment: Identify safe bailout zones in case of failed stops
- Traffic patterns: Note pedestrian flow and potential collision points
- Equipment check: Verify brake pad thickness and wheel integrity
- Physical readiness: Assess fatigue level and environmental conditions
Performance Optimization Strategies
Elite skaters use these evidence-based methods to refine stopping skills:
- Video analysis: Record stops from multiple angles to identify form flaws
- Pressure mapping: Use smart insoles to analyze weight distribution
- Micro-drills: Practice specific stop components in isolation
- Cross-training: Incorporate ice skating or roller skiing for edge control
Pro tip: Maintain a stopping skill journal tracking these metrics weekly:
- Success rate by stop type
- Stopping distance at set speeds
- Equipment wear patterns
- Environmental conditions
Remember that stopping proficiency degrades without practice – even experts should dedicate 20% of each session to stopping drills. The International Inline Skating Association recommends annual skill reassessment to maintain safety standards.
Conclusion: Mastering the Art of Stopping
From basic heel brakes to advanced power slides, we’ve explored every technique to stop confidently on inline skates. Each method serves specific situations, whether you’re navigating city streets or tackling steep hills.
Remember that proper stopping combines equipment knowledge, physical technique, and situational awareness. Your wheels, stance, and environment all dramatically affect stopping performance. Regular practice and equipment maintenance are non-negotiable for safety.
Start with foundational stops and progressively challenge yourself. Track your progress through measured drills and controlled environments. Don’t rush the learning process – mastery comes through consistent, mindful practice.
Now it’s your turn to hit the pavement. Begin with basic stops today, and soon you’ll handle any skating scenario with confidence. Your journey to complete control starts with that first deliberate brake.
Frequently Asked Questions About Stopping When Inline Skating
What’s the easiest stopping method for beginners?
The heel brake is the most beginner-friendly stopping technique. It uses a rubber pad attached to your right skate’s frame that engages when you lift your toes. This method requires minimal balance adjustments and works reliably at moderate speeds (under 10mph).
For optimal control, practice on flat surfaces first. Keep your weight centered over your supporting leg while gradually applying pressure to the brake. Avoid stomping suddenly, as this can cause loss of control.
How do I stop on inline skates without a heel brake?
The T-stop is the most effective non-brake stopping method. Drag your back skate perpendicular to your front skate, keeping 80% weight on your front foot. Start with light pressure and increase as you gain confidence.
This technique requires strong ankles and proper wheel alignment. Beginners should practice at walking speeds first, listening for the sound of all wheels making even contact with the pavement.
Why do I keep spinning out when trying to T-stop?
Spinning out typically occurs from improper weight distribution or skate angle. Your back skate must form a perfect 90-degree angle with your front skate, with minimal weight on the dragging foot.
Another common cause is using only two wheels instead of all four. Practice stationary T-positions first, ensuring full wheel contact before attempting moving stops.
What’s the fastest way to stop in an emergency?
The power slide offers the quickest stopping distance for advanced skaters. Rotate your hips 45 degrees while shifting weight to your lead foot, then extend your trailing foot sideways to create friction.
For beginners, a controlled heel brake combined with a knee slide provides safer emergency stopping. Always scan for safe runoff areas like grass when skating at high speeds.
How often should I replace my heel brake pad?
Replace brake pads when the grooves become shallow (about 3mm remaining). Most last 3-6 months with regular use. Urban skaters may need replacements every 2-3 months due to abrasive pavement.
Rotate pads periodically to ensure even wear. Carry a spare when skating long distances, as worn pads significantly increase stopping distance.
Can I use ice skating stops on inline skates?
Some ice hockey stops translate to inline skates, but require modification. The inline hockey stop uses sharper edges and more forward lean to compensate for wheel grip differences.
Practice on sport court surfaces first, as asphalt can damage wheels during aggressive stops. Expect longer stopping distances compared to ice – about 30-50% more space needed.
Why do my wheels wear unevenly when stopping?
Uneven wear comes from repetitive stopping motions. T-stops primarily wear your back wheels’ inside edges, while power slides affect front wheels’ outer edges.
Rotate wheels every 4-6 skating hours to distribute wear. Consider designating specific wheels for stopping if you frequently skate long distances.
How can I stop safely going downhill?
Use carving turns combined with pulse stops. Make wide S-turns across the hill while applying brief T-stops or heel brakes at each turn’s apex.
Maintain a low stance with bent knees, and never attempt steep hills until you can reliably stop on flat ground. Consider downhill-specific wheels (85A-88A hardness) for better control.