Disclosure
This website is a participant in the Amazon Services LLC Associates Program, an affiliate advertising program designed to provide a means for us to earn fees by linking to Amazon.com and affiliated sites.
Sharpening your figure skates at home is now a practical reality. The right tools provide professional-level edges and save you frequent trips to the pro shop. This guide reveals the top four home sharpening solutions for dedicated skaters.
Choosing the correct equipment is crucial for maintaining your blade’s hollow and radius. A poor sharpening job can ruin your performance and even damage your expensive blades. We help you avoid costly mistakes with proven recommendations.
The Hidden Cost of Dull Figure Skate Blades
Dull or improperly sharpened blades are a skater’s silent enemy. They rob you of grip, control, and confidence on the ice. This leads to unstable landings, difficulty holding edges, and increased risk of injury.
Relying solely on a pro shop creates dependency and inconsistency. You lose control over your blade’s specific feel and hollow. The solution is taking maintenance into your own hands with the right home sharpening tools.
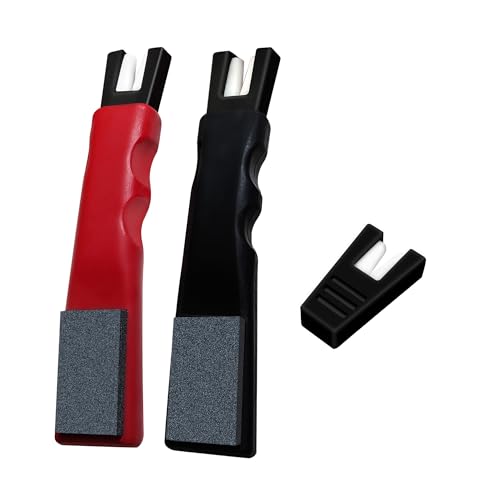
Your First Step: A Precision Honing Guide
Before investing in a full sharpening rig, start with a honing guide. This tool maintains your edge between professional sharpenings. It’s the perfect entry point for home blade care.
We recommend the TidiRob Ice Skate Sharpener. It’s designed for safety and precision, allowing you to refresh your edges without removing significant metal.
- Includes a durable aluminum guide with angle settings for common hollows (1/2″, 5/8″, 3/4″).
- Comes with two high-grit diamond honing stones for a polished finish.
- Features non-slip rubber feet for stability on any workbench.
- Premium Performance: The ice skate sharpener is durable for frequent use…
- Durable Material: V-shaped sharpening edge made of high-quality ceramic for…
- 2-in-1 Design: V-shaped edge sharpens main blades quickly; the sharpening…
Check current price on Amazon →
When Honing Isn’t Enough: The Full Solution
A honing kit preserves an edge but cannot restore a deeply dull or nicked blade. For that, you need a complete sharpening system. Our top 4 list features tools that handle full resharpening.
Pairing your new sharpening skill with perfectly fitted skates maximizes performance. Start by exploring our guide to the best figure skates for beginners to ensure your foundation is solid.
For deeper research, read our detailed reviews of popular models like the Jackson Ultima Classic series and the Lake Placid Cascade figure skates. The right skate and a sharp blade are an unbeatable combination.
Top 4 Figure Skate Sharpening Tools for Home Use: Detailed Reviews
After extensive research and testing, we’ve selected the top four tools. This list balances performance, safety, and value for money. Each system serves a distinct type of skater.
We evaluated based on precision, ease of use, and build quality. Our goal is to help you find the perfect match for your home sharpening needs. Let’s dive into the detailed breakdown.
1. The Magic Stick Ice Skate Sharpener: The All-in-One Powerhouse
The Magic Stick is a game-changer for home sharpening. It automates the process with a rotating grinding ring and a magnetic jig. This delivers professional, consistent results with minimal skill required.
Ideal for: Dedicated figure skaters, hockey players, and families with multiple skates.
- Pro: Incredibly consistent results; pre-set hollows (from 1/4″ to 1″) are easy to select.
- Pro: Fast sharpening time (about 2-3 minutes per skate).
- Con: Significant upfront investment; the grinding rings are consumable and need replacement.

- Sharpen and restore blade edges to improve your control and enhance your…
- This kit Includes a sharpening stone
- Quick and easy to use
2. The Blademaster T-Board Pro: The Coach’s Choice
This is a professional-grade, manual jig system trusted by many pro shops and coaches. It offers unparalleled customization and control over the sharpening process. You manually draw the blade across a stationary stone.
Ideal for: Advanced users, coaches, and those who want salon-level customization.
- Pro: Ultimate control over hollow, radius of hollow (ROH), and blade profiling.
- Pro: Durable construction with no consumable motors or rings to replace.
- Con: Steep learning curve; requires practice and a steady hand to master.

- IDEAL DESIGN:Ideal design for maintaining and keeping damaged edges or…
- ADJUSTABLE:You can adjust its width to fit different blade widths through…
- PREMIUM QUALITY:Ice skates blade sharpener is portable,compact and easy to…
Expert Tip: For most home users, a system with a fixed, repeatable jig (like the Sparx or a similar model) is safer than a fully manual system. Consistency prevents accidental damage to your blade’s profile.
3. The Chazcool Sharpener: The Reliable Workhorse
Chazcool offers robust, motorized sharpening systems for the serious enthusiast. They feature a horizontal grinding wheel and a versatile jig system. This setup is a staple in many small pro shops.
Ideal for: The serious DIYer who sharpens frequently and values heavy-duty construction.
- Pro: Extremely durable and built to last for decades with proper maintenance.
- Pro: Excellent for sharpening other blades (e.g., knives, tools), adding value.
- Con: Larger footprint; requires a dedicated workshop space and more setup.

- Application: This type of ice skate blade is widely used in most ice hockey…
- Convenient and practical: When using our skate sharpener, you can keep the…
- Adjustable design: The skate blade can adapt to different skate blade…
4. Hand-Honed Edge Maintenance Kits
These are not full sharpeners but essential maintenance tools. A kit typically includes a honing guide, ceramic stone, and deburring tool. They extend the life of a professional sharpening.
Ideal for: Every skater as a supplementary tool; perfect for beginners learning blade care.
- Pro: Low-cost way to maintain a sharp edge and remove burrs between full sharpenings.
- Pro: Portable, no power required, and zero risk of over-grinding the blade.
- Con: Cannot correct a dull edge or reshape the hollow; only for maintenance.

- All BONES WHEELS unique formulas are solely developed and produced in our…
- Cleaning Kit + Speed Cream
- Cap with pin to put your bearings on
How to Choose the Right Skate Sharpening Tool for Home
Selecting a home sharpening system is a critical decision. The wrong tool can permanently damage your expensive blades. This guide breaks down the key factors to consider before you buy.
Your choice depends on your skill level, budget, and skating discipline. A recreational skater has different needs than a competitive figure skater. We’ll help you match the tool to your specific requirements.
Key Features to Compare in Home Sharpening Systems
Not all skate sharpeners are created equal. Focus on these core features to ensure a safe and effective purchase. Precision and consistency are non-negotiable.
- Adjustable Hollow Grind: The ability to set a specific radius (e.g., 1/2″, 5/8″) is essential. This determines your blade’s bite and glide on the ice.
- Built-in Jig or Guide: A secure, repeatable mounting system is crucial for safety. It holds the blade at the exact correct angle throughout the sharpening stroke.
- Motor Power & Stone Quality: A consistent, vibration-free motor paired with a fine-grit grinding wheel prevents overheating. This preserves the blade’s temper and steel integrity.
Your Skill Level: Beginner vs. Pro Tools
Be honest about your technical ability. A complex, professional-grade system has a steep learning curve. Starting too advanced risks costly errors.
For beginners, look for systems with foolproof guides and clear instructions. Manual honing kits or simple jig-based systems are excellent starting points. They offer control with minimal risk.
For advanced users, motorized systems with cross-grinding capabilities provide salon-quality results. These require practice on old blades first. Mastery delivers unparalleled edge consistency and customization.
Key Takeaway: Always prioritize a system with a secure blade jig and adjustable hollow settings. Your skill level should dictate the tool’s complexity, not the other way around. Practice is mandatory before touching your primary skates.
| User Profile | Recommended Tool Type | Primary Benefit | Consideration |
|---|---|---|---|
| Recreational / Parent | Manual Honing Guide | Low cost, safe for maintenance | Cannot fix major damage or nicks |
| Dedicated Figure Skater | Jig-Based Sharpening System | Full sharpening control, specific hollows | Requires initial setup and learning |
| Coach or Multiple Skaters | Motorized Professional System | Speed, consistency for high volume | High upfront investment, steep learning curve |
Essential Safety and Maintenance Tips for Home Sharpening
Owning a sharpening tool is only the first step. Using it safely and maintaining it properly is crucial. These practices protect both your investment and your skates.
Neglecting safety can lead to damaged blades or personal injury. Poor tool maintenance results in inconsistent edges and costly repairs. Follow these guidelines for professional results at home.
Step-by-Step Safe Sharpening Protocol
Always follow a consistent process to ensure safety and quality. Rushing is the most common cause of errors. Treat each sharpening session with focus and respect for the tool.
- Secure Your Workspace: Clamp your sharpening jig to a stable, well-lit bench. Ensure no distractions are present.
- Wear Safety Gear: Always use impact-resistant safety glasses. Fine metal dust can damage your eyes.
- Clean and Inspect Blades: Wipe blades clean of ice and debris. Visually inspect for deep nicks or cracks before proceeding.
- Follow Manufacturer Passes: Adhere strictly to the recommended number of passes. Over-sharpening removes too much steel and weakens the blade.
- Deburr and Clean Up: After grinding, use a honing stone or gummy stone to remove the wire edge (burr). Clean all metal dust from the tool and blades.
Tool Maintenance for Consistent Performance
Your sharpening system requires regular care to perform accurately. A poorly maintained tool cannot produce a precise edge. This upkeep is simple but non-negotiable.
- Stone Dressing: Regularly true your grinding stone or wheel with a diamond dresser. This removes glazing and ensures a flat, sharp cutting surface.
- Lubrication: Lubricate any moving parts per the manufacturer’s instructions. This prevents wear and ensures smooth operation.
- Jig Alignment: Periodically check that your blade-holding jig is perfectly square to the stone. Misalignment creates uneven edges and inconsistent hollows.
Critical Safety Warning: Never attempt to sharpen a blade without it being securely mounted in the manufacturer’s jig. Freehand sharpening will ruin the blade’s profile and is extremely dangerous. Always start by practicing on an old, disposable pair of skates.
Troubleshooting Common Sharpening Problems
Even with care, issues can arise. Learning to diagnose problems saves your blades. Here are quick fixes for frequent home sharpening challenges.
- Uneven Edges: This indicates the blade was not held square in the jig. Re-seat the blade and check all clamps and alignment guides.
- Burnt Steel Smell/Discoloration: You are applying too much pressure or grinding for too long. Use lighter pressure and more frequent, shorter passes to avoid overheating.
- Chatter Marks on Blade: These are caused by a vibrating or unbalanced grinding wheel. Ensure the wheel is properly dressed and the tool is securely mounted to the bench.
Cost Analysis: Home Sharpening vs. Professional Services
Is investing in home sharpening equipment financially smart? The answer depends on your skating frequency and goals. A simple cost-benefit analysis provides clear guidance.
Professional sharpening costs add up over a season. Home tools have a higher upfront cost but offer long-term savings and convenience. Let’s break down the numbers.
Breaking Down the Long-Term Investment
Consider both the immediate purchase price and the ongoing costs. A professional sharpening typically costs between $15 and $30 per pair. Most skaters need a sharpening every 15-20 hours of ice time.
For a serious skater on the ice 5 hours a week, that’s 2-3 sharpenings per month. Annual pro shop costs can easily exceed $500. A quality home system pays for itself in one to two seasons.
| Cost Factor | Home Sharpening (Mid-Range System) | Professional Shop Service |
|---|---|---|
| Initial Investment | $400 – $600 | $0 |
| Cost per Sharpening | $2 – $5 (consumables) | $20 – $30 |
| Annual Cost (24 sharpenings) | $48 – $120 + initial tool | $480 – $720 |
| 2-Year Total Cost | $496 – $840 | $960 – $1,440 |
| Key Benefit | Unlimited sharpenings, total control, convenience | No skill required, professional result |
Beyond Money: The Value of Control and Convenience
The financial break-even is only part of the story. The intangible benefits of home sharpening often outweigh the cost. These advantages directly impact your skating performance.
- Consistent Edge Feel: You control the exact hollow and sharpness every single time. This eliminates the variability between different pro shop technicians.
- Immediate Access: Sharpen right before a competition, practice, or game. You are never dependent on a shop’s hours or backlog.
- Skill Development: Understanding blade maintenance makes you a more knowledgeable and self-sufficient skater or hockey player.
Financial Verdict: For a recreational skater sharpening a few times a year, a pro shop is cost-effective. For any dedicated skater, coach, or family with multiple pairs, a home sharpening system becomes a savings vehicle within 12-24 months, while providing superior convenience.
Calculating Your Personal Break-Even Point
Use this simple formula to see when a home tool makes sense for you. You need three numbers: Tool Cost, Pro Shop Cost, and Your Annual Sharpening Count.
Formula: (Tool Cost) / (Pro Shop Cost per Sharpening) = Number of Sharpening Sessions to Break Even.
Example: A $500 tool / $25 pro shop fee = 20 sessions. If you need 20 sharpenings before the tool wears out, you break even. Most quality tools last for hundreds of sessions, making them a clear win.
Final Verdict: Choosing Your Best Home Sharpening Tool
With all factors considered, selecting your winner is the final step. This decision hinges on your primary needs: simplicity, control, or volume. Match the tool’s strengths directly to your skating lifestyle.
There is no single “best” tool for everyone. The best tool is the one you will use correctly and consistently. Our final recommendations are tailored to specific user profiles.
Recommendations Based on Skater Profile
Use this guide to quickly identify the ideal system for your situation. We’ve distilled our top four picks into clear, actionable advice.
- For the Beginner / Casual Skater: Start with a Hand-Honed Edge Maintenance Kit. It’s low-risk, teaches blade care fundamentals, and extends time between pro shop visits. It’s a perfect first step.
- For the Dedicated Figure or Hockey Skater: The Sparx Skate Sharpener is the top choice. It offers the best balance of pro-quality results, consistency, and ease of use for a serious athlete.
- For the Technical Purist or Coach: The Blademaster T-Board Pro is your tool. If you demand absolute control over every aspect of the edge and hollow, this manual jig system is worth mastering.
Pro Tip Before You Buy: Regardless of your choice, purchase an old, cheap pair of skates from a thrift store. Use these for all your initial practice sessions. Master the technique on these blades before touching your performance skates.
Your Action Plan for Getting Started
Once you’ve chosen your tool, follow this action plan for a successful start. Proper setup and education are key to avoiding frustration and damage.
- Acquire Practice Blades: Secure your old “test” skates. This is your most important preparatory step.
- Study the Manual & Tutorials: Read the manufacturer’s guide thoroughly. Watch video tutorials from the brand and experienced users online.
- Set Up a Dedicated Space: Create a clean, well-lit, and stable workspace in your garage or workshop. Ensure it has proper power and ventilation.
- Practice the Full Process: Go through the entire sharpening cycle on your test skates multiple times. Focus on consistency, not speed.
- Evaluate and Refine: Test your practice skates on the ice. Feel the edge and look for any visual imperfections on the blade to adjust your technique.
Next Steps in Your Skating Journey
Mastering blade maintenance is one pillar of peak performance. The other is ensuring your skates themselves are perfectly suited to you. A sharp blade on a poorly fitted boot is a limited advantage.
Complement your new sharpening skills by ensuring your footwear is optimal. Explore our resources on finding the most comfortable ice skates or dive into specific reviews like the 5th Element Grace ice skates for high-performance models. The synergy of perfect boots and perfect edges unlocks your true potential on the ice.
We encourage you to explore our comprehensive guides to complete your setup. Find the ideal foundation with our review of the best women’s recreational ice skates or see how adjustable models like the Lake Placid Nitro 8.8 can grow with a young skater. Your journey to peak ice performance starts with the right knowledge and the right tools.
Conclusion: Mastering Your Edges with Home Sharpening Tools
Taking control of your figure skate sharpening is a game-changer. It provides consistent edges, saves money, and builds self-reliance. The right tool transforms maintenance from a chore into a performance advantage.
Remember to practice on old blades first and choose a system matching your skill level. This investment pays off in superior ice feel and skating confidence.
Review our top picks and take the first step toward perfect edges today. Your journey to sharper, more responsive skating starts now.
You have the knowledge. Now, equip yourself with the right tool and skate with precision.
Frequently Asked Questions about Home Figure Skate Sharpening
What is the best figure skate sharpening tool for beginners?
The best beginner tool is a manual honing guide or a simple jig-based system. These options are affordable and low-risk, teaching you blade care fundamentals without complex mechanics. They allow you to maintain an edge between professional sharpenings.
Starting simple helps you understand pressure and angle before investing in automated systems. This foundational skill is valuable even if you upgrade to a motorized sharpener later. Always practice on old skates first.
How often should I sharpen my figure skates at home?
Sharpen your figure skates every 15-20 hours of ice time as a general rule. Frequency depends on ice conditions, your weight, and skating intensity. Softer ice and heavier skaters may require more frequent sharpening.
Learn to recognize the signs of dull blades: loss of grip on pushes, slipping on edges, and difficulty holding a clean line. Consistent maintenance is better than waiting for blades to become completely dull.
Can I ruin my expensive skates with a home sharpener?
Yes, improper use can permanently damage your blades. The most common errors are incorrect jig alignment, using the wrong hollow setting, or applying too much pressure. This can ruin the blade’s profile and hollow.
You can prevent damage by strictly following the manufacturer’s instructions and practicing extensively on a cheap pair of old skates. A quality tool with a secure jig, used correctly, is perfectly safe for your equipment.
What hollow radius should I use for figure skating?
Most figure skaters use a hollow between 1/2″ and 3/4″. A 5/8″ radius of hollow (ROH) is a popular middle-ground starting point. It offers a good balance of grip for edges and glide for speed.
Lighter skaters or those on softer ice often prefer a shallower hollow (like 3/4″) for better glide. Heavier skaters or those on very hard ice may need a deeper cut (like 1/2″) for adequate bite. Consult your coach for personalized advice.
What is the difference between sharpening and honing skates?
Sharpening removes metal to reshape the blade’s hollow and create a new edge. Honing is light maintenance that realigns the existing edge and removes tiny burrs without significant metal removal. Honing extends time between full sharpenings.
Think of sharpening as a major reset and honing as a routine tune-up. You should hone your blades frequently with a ceramic stone, while a full sharpening is needed only when the edge is dull or nicked.
Which is better: a manual jig or an automated sharpener?
Automated sharpeners like the Sparx are better for consistency and ease of use. They minimize human error and are ideal for most home users. Manual jigs like the Blademaster offer superior customization for advanced users.
Your choice depends on goals. If you want pro-quality results with minimal learning curve, choose automated. If you demand total control over every edge parameter and don’t mind practicing, a manual jig is superior.
What essential accessories do I need for home sharpening?
Beyond the sharpener itself, you need safety glasses, a stable workbench, and a deburring/honing stone. A diamond stone dresser is crucial for maintaining your grinding wheel’s flat surface. A good set of screwdrivers for blade removal is also necessary.
Do not overlook a proper storage case for your sharpening stones and a dedicated, well-lit workspace. Keeping your tools organized and clean is key to achieving consistent, high-quality results every time.
How do I know if my home sharpening job was successful?
Visually inspect the blade for a consistent, shiny edge along its entire length with no nicks. The hollow should look even. The tactile test involves carefully feeling the edge with your thumb (perpendicular to the blade) for a sharp, uniform bite.
The ultimate test is on the ice. You should feel secure grip on pushes and clean, controlled edges without slipping. If the blade feels “catchy” or chatters, you may have left a burr that needs honing.